Connect with us

Video

Unlock the Secret Powers of Your Samsung S26 Ultra S-Pen

Published

on

If you own a Samsung Galaxy S26 Ultra, you’re likely already aware that its built-in S-Pen is more than just a fancy stylus. However, what many users don’t realize is that this slim tool hides a treasure trove of capabilities that can transform the way you work, create, and interact with your phone. In a recent deep-dive video, tech expert Sakitech reveals seven powerful S-Pen features that most people never even touch. From lightning-fast note-taking to artistic flourishes, these tricks will make you wonder how you ever lived without them.

1. Screen Off Memo: Instant Capture, Zero Fuss

One of the most underutilized yet game-changing features is Screen Off Memo. As the name suggests, you can pull out the S-Pen while the screen is off, start writing immediately, and save your note without ever unlocking the phone. This is perfect for jotting down a sudden idea, a phone number, or a shopping list. Building on this, you can even pin the memo to the Always On Display, so your reminder stays visible at a glance. No more fumbling for apps or waiting for the screen to wake up.

2. Smart Select: Copy Text from Anywhere

Have you ever wanted to grab text from a video, an image, or a non-selectable app? Smart Select does exactly that. By drawing a rectangle with the S-Pen around the area you want, the phone instantly recognizes text and lets you copy it to your clipboard. This feature is a lifesaver for research, saving quotes from social media, or extracting information from screenshots. In addition, you can also create GIFs from video clips with the same tool, adding a fun, shareable element to your workflow.

3. Air Command: Your Command Center in the Sky

Air Command is the S-Pen’s main menu, but most users only scratch the surface. When you hover the pen over the screen and press the button, a radial menu appears with shortcuts to features like Create Note, Smart Select, Screen Write, and more. However, you can customize this menu to include your most-used apps or actions. For example, you can add a direct link to Google Keep, your calendar, or even a specific contact. This customisation turns the S-Pen into a true productivity hub.

4. Translate with a Hover

Imagine reading a foreign language menu or website and instantly translating a word without switching apps. With the S-Pen’s Translate feature, you simply hover over the word, and a pop-up shows the translation. This works in any app, from browsers to PDF readers. As a result, language learners and travelers can save significant time and effort. The feature supports dozens of languages and even works offline if you download the language packs.

5. AR Doodle: Bring Your Photos to Life

For those with a creative streak, AR Doodle is a hidden gem. After taking a photo or video, you can use the S-Pen to draw on the scene, and the drawings will track with the movement of faces or objects in real time. This creates fun, animated overlays perfect for social media stories or just amusing friends. Building on this, you can also add text, emojis, and effects, making every shot a unique piece of art.

6. Screen Write: Annotate and Share Instantly

Screen Write is like taking a screenshot, but with instant annotation capabilities. After capturing the screen, the S-Pen automatically opens an editing interface where you can draw, highlight, or write directly on the image. This is invaluable for marking up documents, giving feedback on designs, or creating quick tutorials. In addition, you can crop, resize, and share the annotated screenshot in one smooth flow, without needing a third-party app.

7. Glance and Magnify: Precision at Your Fingertips

Finally, two subtle but powerful gestures: Glance and Magnify. Glance lets you hover the S-Pen over an app icon to see a quick preview of its content (like an email or message) without opening it. Magnify, on the other hand, turns the S-Pen into a magnifying glass, enlarging any area of the screen for precise editing or reading small text. These features are especially useful for designers, photographers, or anyone who values detail.

Why These Features Matter

Many of us treat the S-Pen as a simple input device, but as Sakitech’s video demonstrates, it’s actually a Swiss Army knife for your Galaxy S26 Ultra. By mastering these seven features, you can significantly boost your daily productivity, enhance your creativity, and get more value from your device. Whether you’re a professional, a student, or just a tech enthusiast, these tools can streamline tasks that used to take multiple steps.

Watch the Full Video for a Live Demo

To see these features in action and learn even more tips, check out the full video by Sakitech. He walks through each feature step by step, showing exactly how to enable and use them. After watching, you’ll never look at your S-Pen the same way again. Click the link below to unlock the full potential of your Samsung S26 Ultra S-Pen.

Continue Reading
Click to comment

Leave a Reply

Your email address will not be published. Required fields are marked *

Video

One Claude AI Prompt Made Him Six Figures a Month — Here’s the Exact Script

Published

on

Imagine waking up to a notification that your YouTube channel just earned six figures in a single month — all because of one carefully crafted prompt for Claude AI. That’s exactly what happened to Shane Hummus, a creator who cracked the code on using artificial intelligence not as a crutch, but as a force multiplier. In a recent deep-dive video, he reveals the exact prompt that transformed his channel and outlines a blueprint that any serious creator can replicate. This isn’t about churning out generic scripts or copying competitors. Instead, it’s a systematic approach to making AI sound exactly like you — and scaling your output without sacrificing authenticity.

Why Most Creators Use AI Completely Wrong

Building on this idea, Shane argues that the biggest mistake creators make is using AI to generate content from scratch without any foundation. Writing a prompt cold — without providing examples, tone guidelines, or a clear structure — almost always produces bland, robotic text that viewers can sniff out instantly. The result? Low engagement, poor watch time, and a channel that feels soulless. The alternative, he explains, is to treat AI like a junior writer who needs detailed instructions and reference material. By feeding it your best-performing scripts and defining your unique voice upfront, you can produce content that feels authentically yours — at scale.

The Master Prompt That Builds Every Other Prompt

At the heart of Shane’s method is what he calls the “master prompt” — a single, comprehensive instruction set that teaches Claude AI to mimic his voice, structure, and strategic goals. This prompt isn’t just a one-liner; it’s a multi-paragraph document that includes:
– **Voice characteristics**: Tone, sentence length, rhetorical devices, and humor style.
– **Structural rules**: How to open with a hook, transition between points, and close with a call to action.
– **Content constraints**: Topics to avoid, required keywords, and formatting preferences.

Once this master prompt is locked in, he can reuse it across dozens of scripts, ad copy, and social posts — all while maintaining consistency. The real magic, however, lies in the “voice technique” that few creators talk about: training AI on your actual spoken cadence by providing transcriptions of your best videos. This step alone can double or triple the natural feel of AI-generated content.

The Content Matrix: How One Prompt Built a Database of 350 Videos

In addition to voice cloning, Shane reveals a hidden database his master prompt secretly built over time. Every time he generates a script, the system logs the topic, structure, and performance metrics. This creates a content matrix — a living spreadsheet that organizes ideas by niche, format, and estimated virality. Using this matrix, he was able to produce 350 unique videos in a matter of hours, each tailored to a different audience segment. The key? The master prompt isn’t static; it evolves with every piece of feedback, learning what works and what doesn’t.

As a result, this system doesn’t just save time — it eliminates the guesswork from content planning. Instead of staring at a blank page, creators can pull from a pre-vetted list of high-potential topics, each with a ready-made script that already sounds like them. Shane even shares a specific Facebook ads prompt that uses the same matrix to generate high-converting copy, proving the method works across platforms.

The Deeper Secret: Beating the Experts at Their Own Game

Perhaps the most surprising insight from Shane’s video is that this approach works best for new or small channels. While established creators often rely on personal brand and loyal audiences, newcomers can use the content matrix to out-strategize competitors by producing more relevant videos faster. The prompt acts as a strategic advisor, not just a writing tool — it identifies gaps in the market, suggests angles that competitors overlook, and ensures every piece of content serves a specific outcome (views, subscribers, or revenue).

To see the exact step-by-step workflow and get the prompts Shane uses, watch the full video below. Whether you’re a seasoned YouTuber or just starting out, this one Claude AI prompt could be the difference between struggling for views and building a six-figure channel.

Continue Reading

Video

How to Fix Windows Cannot Connect to Printer Error 0x000000006 in Windows 11/10

Published

on

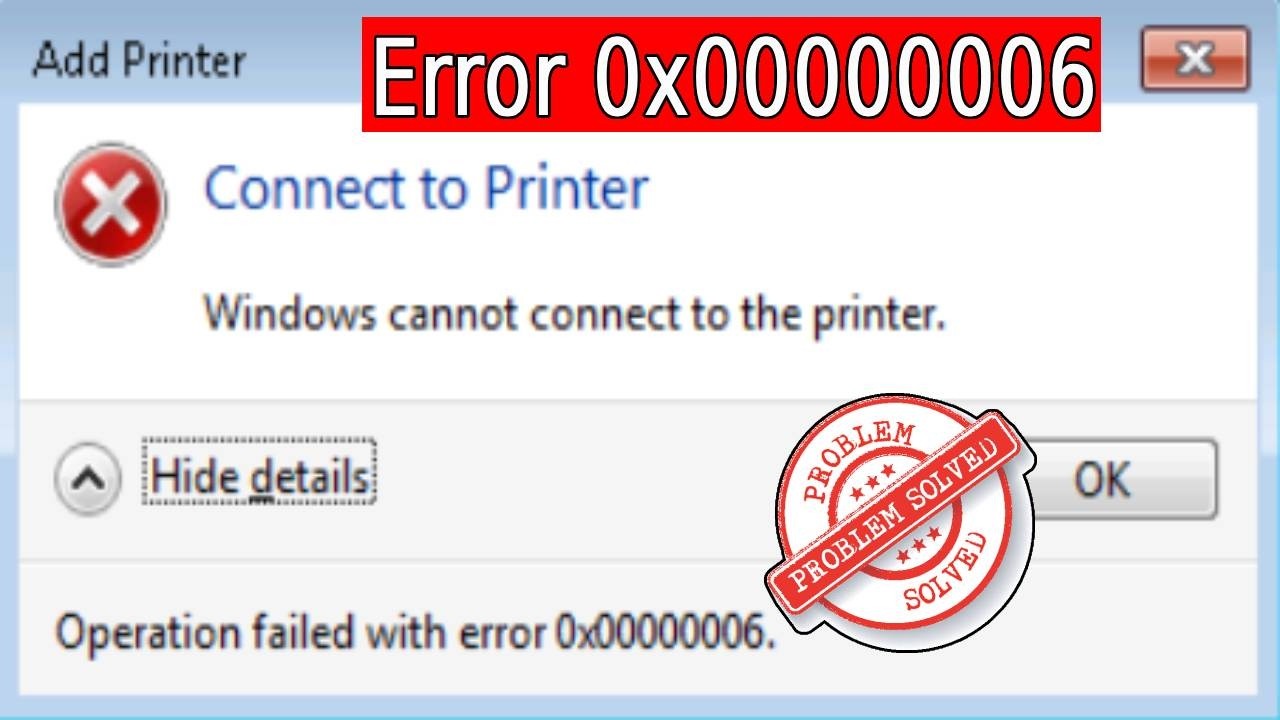
Imagine you’re about to print an important document, and suddenly Windows throws a cryptic error: “Operation failed with error 0x000000006.” It’s frustrating, especially when you’re on a deadline. This error commonly appears in Windows 11 and Windows 10 when trying to connect to a network printer. Fortunately, there’s a reliable fix—and it doesn’t require advanced IT skills.

In a detailed tutorial video, the creator walks through three proven methods to resolve this error 0x000000006. The steps range from a quick registry tweak to restarting a key system service and manually adding the printer over the network. Building on this, the video also includes a bonus tip for updating printer drivers. Let’s break down each solution so you can get back to printing without the headache.

Understanding the Error 0x000000006

The error 0x000000006 typically appears when Windows fails to communicate with a shared printer over a network. It might stem from corrupted print provider settings, a stalled Print Spooler service, or incorrect network paths. As a result, the system refuses to connect, leaving you stuck. However, the video addresses each root cause systematically.

Why Does This Error Happen?

* Corrupted Client-Side Rendering (CSR) print provider registry key.
* Print Spooler service not running or malfunctioning.
* Incorrect printer share name or network path.
* Outdated or incompatible printer drivers.

Therefore, tackling these issues in order—starting with the registry—often resolves the problem permanently.

Method 1: Registry Editor – Delete the CSR Print Provider Key

The first fix involves editing the Windows Registry. This step removes a problematic Client-Side Rendering Print Providers key that can block printer connections. The video demonstrates this clearly:

1. Press the **Windows key**, type “registry editor,” and open it.
2. Navigate to: `HKEY_LOCAL_MACHINESOFTWAREMicrosoftWindows NTCurrentVersionPrintProviders`
3. Find the key named **Client Side Rendering Print Providers**.
4. Right-click it and select **Delete**.

After deleting the key, close the Registry Editor. At this point, you can attempt to connect to the printer again. However, if the error persists, move to the next method.

**Note:** Editing the registry carries risks. Always back up the registry before making changes. The video creator recommends this as a safe step for most users.

Method 2: Restart the Print Spooler Service

The Print Spooler is the heart of Windows printing. If it’s stuck or corrupted, you’ll see error 0x000000006. Restarting it is quick and effective:

1. Press **Windows key**, search for “services,” and open the Services console.
2. Scroll down and locate **Print Spooler**.
3. Right-click it and select **Restart**.
4. Wait a few seconds for the service to restart.

In addition, you can set the service to start automatically by double-clicking it and ensuring the Startup type is **Automatic**. This prevents future interruptions. After restarting, try adding the printer again.

Method 3: Add a Local Printer Through Network

If the above steps don’t work, the video suggests manually adding the printer via the network path. This method bypasses automatic detection issues:

1. Open **Control Panel** > **Devices and Printers**.
2. Click **Add a printer**.
3. If no printer appears, select **The printer that I want isn’t listed**.
4. Choose **Add a local printer or network printer with manual settings**.
5. In the next screen, select **Create a new port** and choose **Standard TCP/IP Port**.
6. Enter the network path in the format: `\ComputerNameSharedPrinterName`.
7. Follow the prompts to install the driver and complete setup.

This approach works even when Windows fails to detect the printer automatically. As a result, you can connect directly using the exact share name.

Bonus: Update Printer Drivers

The video also mentions updating the printer driver as a preventive measure. Outdated drivers can cause error 0x000000006. To update:

1. Go to **Device Manager**.
2. Expand **Print queues**.
3. Right-click your printer and select **Update driver**.
4. Choose **Search automatically for drivers**.

If Windows doesn’t find a new driver, visit the printer manufacturer’s website for the latest version.

Final Thoughts

Error 0x000000006 can be a showstopper, but it’s not insurmountable. By following the registry fix, restarting the Print Spooler, and manually adding the printer, you can restore connectivity in minutes. The video tutorial provides a step-by-step visual guide that makes the process even easier. For best results, try the methods in order—they’re designed to address the most common causes first.

If you’re still facing issues after these steps, consider checking your network permissions or firewall settings. However, for most users, these three fixes will resolve the error 0x000000006 quickly.

Watch the full video below to see each step in action, including timestamps for quick navigation. Don’t forget to like, comment, and subscribe if it helps you out!

Continue Reading

Video

Samsung One UI 8.5 Battery Drain: A Definitive Fix Guide

Published

on

If you own a Samsung Galaxy device and have recently updated to the latest One UI 8.5 build, you might be experiencing a frustrating drop in battery life. You are far from alone. Many users have reported that their phones are draining power faster than usual, even when idle. This issue often stems from corrupted background logs and hidden scanning loops that the new software can trigger. Fortunately, there is a reliable, step-by-step solution that can help you reclaim your device’s battery performance.

Understanding the One UI 8.5 Battery Drain Problem

The update brings significant performance enhancements and new features, but it can also introduce glitches. Specifically, One UI 8.5 may corrupt temporary data logs, causing the processor to enter an infinite background scanning cycle. This constant activity drains battery life, especially during standby. However, by following a systematic calibration approach, you can stop the drain and restore your phone’s screen-on time.

Method 1: Clear Glitched One UI Home Launcher Cache

First, you need to address corrupted cache blocks within the One UI Home launcher. This step is safe and does not delete your home screen layouts. Navigate to Settings > Apps > One UI Home > Storage, then tap “Clear Cache.” This removes temporary data that may be causing the launcher to run inefficiently. Restart your phone afterward to see immediate improvements.

Method 2: Disable Idle Network Drain

Background wireless pings—such as those from network scanning and printer discovery—can constantly wake your CPU. To fix this, go to Settings > Connections > Wi-Fi > Advanced, and disable “Wi-Fi scanning” and “Bluetooth scanning.” Additionally, turn off “Nearby device scanning” in the Connections menu. This prevents your phone from continuously searching for networks and devices while idle, significantly reducing battery drain.

Method 3: Activate Automated Optimization Restarts

One UI 8.5 includes a built-in feature that can automatically restart your phone to clear memory leaks. Enable “Auto optimization” in Settings > Battery and device care > Auto optimization. Set a schedule for nightly restarts—this will flush out rogue processes and keep your system running smoothly. It’s a simple yet effective way to maintain battery health over time.

Method 4: Calibrate System Performance with Galaxy App Booster

Samsung’s Good Guardians suite offers powerful tools for battery management. Install the Galaxy App Booster from the Galaxy Store. Run it to optimize app performance and clear temporary system caches. This tool recalibrates how apps interact with the system, reducing unnecessary background activity. Combined with Battery Guardian, which limits background app activity, you can extend your battery life significantly. These utilities are essential for anyone dealing with One UI 8.5 battery drain.

Method 5: Deep Sleep App Isolation

Finally, identify and isolate apps that are draining power in the background. Go to Settings > Battery and device care > Battery > Background usage limits. Enable “Put unused apps to sleep” and manually add apps that you rarely use to the “Deep sleeping apps” list. This forces them to stop running background tasks, preserving battery for the apps you actually need. Repeat this process weekly to keep your device optimized.

Conclusion and Next Steps

By following these five methods, you can effectively address the One UI 8.5 battery drain issue and restore your Samsung Galaxy’s battery life. Start with the cache clear and network adjustments, then move to automated restarts, app calibration, and deep sleep isolation. For a complete walkthrough, watch the full video guide above. It provides visual steps and additional tips to track down rogue app leaks. Your battery performance will thank you.

Continue Reading

Trending