Connect with us

How To

How to Use ChatGPT: A Complete Beginner’s Guide to Getting Started

Published

on

How to Use ChatGPT: A Complete Beginner’s Guide to Getting Started

Artificial intelligence is no longer a futuristic concept—it’s here, and it’s remarkably accessible. ChatGPT, the conversational AI developed by OpenAI, has taken the internet by storm since its release in late 2022. But for many newcomers, the question remains: how to use ChatGPT effectively? This guide walks you through every step, from creating an account to writing your first prompt.

What Exactly Is ChatGPT?

ChatGPT stands for Chat Generative Pre-Trained Transformer. It is a large language model (LLM) trained on vast amounts of human-generated text. This training enables it to understand context, answer questions, write essays, generate code, compose song lyrics, and much more. Unlike a standard search engine, ChatGPT holds conversations and remembers context within a single session.

One of its standout features is versatility. You can ask it about history, science, pop culture, or even request help with creative writing. The platform is designed to feel like talking to a knowledgeable friend—not a robotic FAQ machine.

How to Sign Up for ChatGPT: Step-by-Step

Before you can start using ChatGPT, you need an OpenAI account. The process is straightforward and free. Here’s exactly what to do:

Step 1: Visit the ChatGPT Website

Open your preferred web browser and go to chat.openai.com. Click the Sign Up button to begin.

Step 2: Create Your Account

You have two options: enter your email address and create a password, or sign up using your Google or Microsoft account. The latter is faster—just one click. If you choose email, make sure to use a valid address because you will need to verify it.

Step 3: Verify Your Email

Open your inbox and look for a verification email from OpenAI. Click the link inside to confirm your account. This step is crucial—without verification, you cannot log in.

Step 4: Complete Your Profile

After verification, you may be asked to provide your name and a few other details. Fill them in and proceed. Once done, you will land on the ChatGPT interface.

How to Use ChatGPT After Signing Up

Once your account is active, using ChatGPT is incredibly intuitive. The main screen shows a text input bar at the bottom and a conversation window above.

Type your question or command into the bar and press Enter. The AI will generate a response within seconds. If the answer isn’t quite what you wanted, you can click the Regenerate button to get a fresh version. You can also edit your original prompt to be more specific.

Remember: the more detail you provide, the better the output. Instead of asking “Write a poem,” try “Write a short, rhyming poem about a cat who loves rain.” Specificity is your best friend when learning how to use ChatGPT effectively.

Can You Use ChatGPT on Mobile?

As of now, there is no official ChatGPT app on the Google Play Store or Apple App Store. However, you can absolutely use ChatGPT on your smartphone. Simply open any mobile web browser—like Chrome, Safari, or Firefox—and go to chat.openai.com. Log in with your credentials, and the full chatbot experience is available in your browser.

This means you can ask questions, draft emails, or brainstorm ideas while on the go. The interface is responsive and works well on both Android and iOS devices.

Tips for Getting the Best Results from ChatGPT

To truly master how to use ChatGPT, keep these strategies in mind:

  • Be clear and direct. Avoid vague prompts. State exactly what you need.
  • Use follow-up questions. ChatGPT remembers the conversation within a session, so you can refine answers naturally.
  • Start a new chat for new topics. Click the New Chat button in the top-left corner to clear the memory and avoid confusion between subjects.
  • Experiment with different tones. Ask for a formal version, a humorous version, or a simpler explanation. The AI adapts.

Building on this, you can also use ChatGPT for practical tasks like summarizing articles, translating text, or debugging code. The possibilities are vast—and entirely free for now.

Is ChatGPT Really Free?

Yes, the basic version of ChatGPT is completely free to use. OpenAI has not yet introduced a mandatory paid tier for general users. There is a premium subscription called ChatGPT Plus, which offers faster response times and priority access during peak hours, but the free version remains powerful enough for most tasks.

This means you can explore, learn, and create without spending a dime. For a deeper dive into AI tools, check out our guide on how to use Canva to earn money or learn about checking suspicious links before clicking to stay safe online.

Final Thoughts

ChatGPT is one of the most accessible AI tools available today. Whether you are a student, writer, developer, or just curious, the platform offers a low-barrier entry into the world of generative AI. By following the steps above, you now know how to use ChatGPT from sign-up to advanced prompting.

If you encounter any issues during the process, revisit the verification step or try refreshing the page. The platform is constantly improving, and with a little practice, you will be generating high-quality responses in no time.

Continue Reading
Click to comment

Leave a Reply

Your email address will not be published. Required fields are marked *

How To

How to Set Up Crash Detection on Your Android Phone: A Complete Guide

Published

on

How to Set Up Crash Detection on Your Android Phone: A Complete Guide

Imagine you’re driving home after a long day. Suddenly, your car jolts violently. In those crucial seconds, your phone could become your lifeline. That’s exactly what crash detection on Android is designed for. Built into select devices, this smart safety feature automatically senses a car accident and alerts emergency services or your loved ones. If you own a Google Pixel phone or a Pixel Watch, you can activate this life-saving tool in just a few minutes. This guide walks you through everything you need to know.

What Is Crash Detection and How Does It Work?

Crash detection relies on a combination of hardware and software. Your phone’s motion sensors—accelerometers and gyroscopes—constantly monitor for sudden stops, sharp impacts, and rapid changes in speed. When the system detects a potential collision, it triggers an immediate alert on your screen.

You’ll see two clear options: “I’m OK” or “Call 911 & notify contacts.” If you don’t respond within 60 seconds, the phone automatically places an emergency call. It also shares your real-time location and an audio message with dispatchers. This ensures help arrives quickly, even if you’re unable to speak.

Artificial intelligence plays a key role here. The system learns from real-world driving data to distinguish between a minor pothole and a serious accident. It evaluates speed, force, and movement patterns before sending an alert. As a result, false alarms are rare, and genuine emergencies get immediate attention.

How to Set Up Crash Detection on Your Android Phone

Crash detection isn’t turned on by default. You need to enable it manually. The process is straightforward and takes less than five minutes. Follow these steps on a Pixel phone running Android 12 or later:

Step 1: Open the Personal Safety App

Locate the Personal Safety app on your Pixel phone. It comes pre-installed on all Pixel devices from the Pixel 4A onward. If you can’t find it, search for “Safety” in your app drawer.

Step 2: Navigate to Car Crash Detection

Tap the Features tab at the bottom of the screen. Look for Car Crash Detection and select Set up. Toggle the switch to enable the feature. You’ll also see an option for Emergency Sharing—turn that on to automatically share your location with contacts during an accident.

Step 3: Add Emergency Contacts

Still inside the Safety app, go to Your info and tap Emergency contacts. Add trusted family members or close friends. Make sure they have permission to view your location and receive alerts. Once saved, your phone will notify them if a crash is detected and you don’t respond.

That’s it. Your Pixel phone is now ready to act as a silent guardian on the road.

How to Enable Crash Detection on a Pixel Watch

If you own a Pixel Watch 2 or Pixel Watch 3, you can also activate crash detection on your wrist. The watch uses its own sensors, but it needs cellular connectivity to send alerts independently. If you’ve already set up the feature on your phone, it syncs automatically. Otherwise, here’s how to enable it:

  • Press the crown button on your Pixel Watch.
  • Tap Safety in the settings menu.
  • Select Car Crash Detection and toggle it on.

Alternatively, use the Pixel Watch app on your phone:

  • Open the Pixel Watch app.
  • Tap Safety & Emergency settings.
  • Choose Car Crash Detection and activate it.

Keep in mind that the watch does not manage emergency contacts directly. You must add them through the Personal Safety app on your phone. Also, for the watch to work during a crash, it must stay connected to a mobile network or your phone.

The Future of Crash Detection Technology

Crash detection is still evolving. Google continuously updates the system using machine learning to improve accuracy. Future updates will likely reduce false positives even further and expand support to more devices.

Other manufacturers are paying attention too. Samsung is reportedly developing its own version for Galaxy phones. Apple already offers crash detection on iPhones and Apple Watches. As competition grows, this feature will become standard across the industry.

Emergency services are also adapting. Better smartphone integration means faster response times. In the future, your phone might share medical details or vehicle information with first responders. This could save countless lives by cutting precious seconds off emergency response.

Final Thoughts

Setting up crash detection on Android is one of the smartest safety moves you can make. It takes only a few minutes, yet it provides round-the-clock protection on the road. Whether you’re driving across town or across the country, this feature ensures that help is always just a sensor away.

If you haven’t enabled it yet, open the Personal Safety app right now. Add your emergency contacts, toggle on car crash detection, and drive with greater peace of mind.

Continue Reading

How To

Android Can Print Photos, Emails, and Documents Without a Computer – A Complete Guide

Published

on

Android Can Print Photos, Emails, and Documents Without a Computer – A Complete Guide

Modern smartphones have transformed how we handle everyday tasks. One standout feature is the ability to print from Android phone directly, without needing a desktop or laptop. Whether you need a physical copy of a boarding pass, a family photo, or an important work email, your Android device can handle it all. Wireless technology, combined with built-in system tools, makes this process remarkably simple.

This guide walks you through every available method. You will learn how to set up your device, connect to various printers, and print different types of content. By the end, you will be able to manage all your printing needs straight from the palm of your hand.

Why Print From Your Android Phone?

Printing directly from a mobile device offers several practical advantages. It saves time and reduces reliance on traditional computer setups.

Unmatched Convenience

You can send a document to print without booting up a PC. This is especially useful when you are away from your desk or traveling. Wi-Fi and Bluetooth connections allow your phone to communicate with a printer instantly, turning any location into a mini office.

Simple Setup Process

Most modern printers support easy pairing. The setup usually involves a few taps in the settings menu. Printer manufacturers also provide dedicated apps that guide you through the installation, making it accessible even for those who are not tech-savvy.

Shared Access for Multiple Users

In a home or small office, several people can connect to the same printer. Each person can send their own print jobs from their individual devices. This reduces the need for multiple machines and keeps the workspace efficient.

Using the Built-in Default Print Service

Android devices come with a native printing feature. This is often the quickest way to get started.

Enable the Service

First, open the Settings app on your phone. Navigate to Connected Devices, then tap Connection Preferences. Look for the Printing option and select Default Print Service. Toggle the switch to turn it on. Note that menu names can vary slightly depending on your phone manufacturer and Android version.

Connect a Wireless Printer

Ensure your printer supports Wi-Fi or Bluetooth. Turn the printer on and wait for it to appear in the service list on your phone. Once detected, you can proceed to print.

Print a Document or Photo

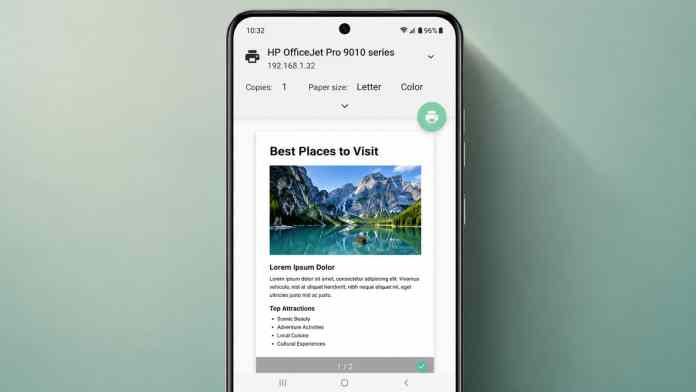
Open the file you want to print. Tap the menu icon (often three vertical dots) and select Print. Choose your printer from the list, adjust settings like paper size or color, and tap the print button. This method works for documents, photos, and web pages.

Using Manufacturer Applications

Printer brands often release their own apps. These can improve compatibility and offer extra controls.

Popular Printer Apps

Many brands provide dedicated plugins. Examples include HP Print Service Plugin, Brother Printer Service Plugin, Canon Print Service, Samsung Print Service Plugin, and Epson iPrint. These applications often detect printers faster than the default service.

Installation and Printing

To install, go to your Android printing settings. Select Default Print Service and tap Add Service. This will open the Google Play Store. Find your printer’s app, download it, and enable it in the settings. After that, printing is as simple as opening a file, tapping the menu, and selecting your printer.

Bluetooth and NFC Printing

For printers that support it, Bluetooth provides a reliable wireless connection without a Wi-Fi network.

Pairing via Bluetooth

Turn on Bluetooth on both your phone and the printer. In your phone’s Bluetooth settings, select Pair New Device and choose your printer from the list. Enter a PIN if prompted. Once paired, you can print from any app by selecting the Bluetooth printer from the print menu.

However, Bluetooth has a limited range. Keep your phone close to the printer and avoid disabling Bluetooth during the print job to prevent interruptions.

Faster Connections with NFC

Some printers include an NFC (Near Field Communication) tag. Enable NFC on your phone and tap it against the marked area on the printer. The devices will connect automatically, bypassing the manual pairing process.

Wi-Fi and Network Printing

Wi-Fi printing is the most popular method because of its speed and range.

Connect to the Same Network

Both your phone and printer must be connected to the same Wi-Fi network. Verify the network name on both devices. If they are on different networks, the printer will not appear in the available list.

Manual Printer Addition

If your printer is not detected automatically, you can add it manually. In the printing settings, tap the three-dot menu and select Add Printer. You can choose Wi-Fi Direct or enter the printer’s IP address. This often resolves detection issues.

USB and Third-Party Solutions

For those without a wireless printer, USB printing is still an option, though it requires an OTG adapter.

USB Setup

Connect a USB cable to your printer, attach it to an OTG adapter, and plug the adapter into your phone. You will need a printing app like NokoPrint or PrintShare Mobile Print to manage the connection. The app will guide you through installing the necessary drivers.

PaperCut Mobility Print

Since Google Cloud Print was discontinued, PaperCut Mobility Print has become a reliable alternative. Install the app on your phone and ensure both devices are on the same network. Create an account, enable the service, and you can print securely from anywhere.

Printing Specific Content: Photos, Messages, and Emails

Print Photos

Open Gallery or Google Photos. Select the image, tap the menu icon, and choose Print. Adjust color and orientation settings before sending the job.

Print Text Messages

For a quick solution, take a screenshot of your conversation. Open the screenshot, tap Share, and select Print. For longer conversations, use an app like Super Backup and Restore. Backup your SMS, open the backup file, and tap print.

Print Emails

Open Gmail or Outlook. Tap the three-dot menu on the email and select Print. Choose your printer and adjust settings like paper size. The email will print like any other document.

Final Thoughts

The ability to print from Android phone has eliminated the need for a computer in many scenarios. Whether you use Wi-Fi, Bluetooth, a manufacturer app, or a USB cable, the process is straightforward and efficient. Mobile printing saves time, reduces clutter, and keeps you productive no matter where you are.

For more tips on getting the most out of your device, check out our guide on Android productivity hacks or learn how to manage notifications effectively.

Continue Reading

How To

Set Dialogue Caller Ringtone for Incoming Calls: A Step-by-Step Guide to Using This Fun App

Published

on

Set Dialogue Caller Ringtone for Incoming Calls: A Step-by-Step Guide to Using This Fun App

Are you tired of the same old boring ringtones that everyone else uses? Do you want your phone to stand out every time someone calls? If so, you are in for a treat. Today, we explore a simple yet entertaining way to set dialogue caller ringtone for incoming calls using a dedicated mobile application. This app transforms your smartphone experience by letting you replace standard sounds with memorable lines from movies, comedy sketches, or popular dialogues.

Many users feel frustrated when their phone lacks personality. Default ringtones often feel generic and uninspired. Fortunately, this app solves that problem effortlessly. It offers a vast collection of pre-loaded audio clips, making it incredibly easy to dialogue caller ringtone customization a reality for everyone. Whether you love punchy one-liners or dramatic quotes, there is something for every taste.

What Is the Set Dialogue Caller Ringtone App?

This is a lightweight Android application designed specifically for users who want to add a personal touch to their incoming calls. Instead of searching the internet for individual audio files, this app bundles hundreds of dialogue-based ringtones in one place. You can browse, preview, and apply them directly without any technical hassle.

In addition, the app is completely free to download from the Google Play Store. It requires minimal permissions and works on most Android devices running version 5.0 and above. The interface is user-friendly, making it accessible even for those who are not tech-savvy.

How to Download and Install the App

Getting started is straightforward. Follow these simple steps to install the app on your smartphone:

  1. Open the Play Store: Launch the Google Play Store on your Android device.
  2. Search for the App: Type “Set Dialogue Caller Ringtone” into the search bar and hit enter.
  3. Select the Correct App: Look through the results and tap on the app with the matching name and icon.
  4. Install: Click the green “Install” button. The app will download and install automatically within a few seconds.
  5. Open the App: Once installed, tap “Open” to launch it for the first time.

Alternatively, you can use a direct download link provided on the developer’s website. However, using the Play Store is recommended for security and automatic updates.

Step-by-Step Guide to Set a Dialogue Caller Ringtone

After installation, setting your favorite dialogue as a ringtone takes only a few taps. Here is how to do it:

Grant Necessary Permissions

When you first open the app, it will request access to your phone’s storage and settings. Grant these permissions so the app can function correctly. Without them, you cannot apply ringtones.

Browse and Preview Ringtones

Inside the app, you will find a categorized list of dialogue ringtones. Categories may include comedy, action, drama, or popular movie quotes. Tap any clip to hear a preview. This allows you to decide if the tone suits your style before applying it.

Set as Default Ringtone

Once you find the perfect clip, tap the “Set as Ringtone” button. The app will automatically assign that audio file to your incoming calls. You can also choose to set it for specific contacts or as an alarm sound, depending on the app’s features.

That is all there is to it. Your phone now plays a unique dialogue every time someone calls you. It is a fun way to surprise friends and family.

Why You Should Try This App

There are several compelling reasons to give this app a try. First, it eliminates the need to manually download and convert audio files. Everything is ready to use out of the box. Second, the variety is impressive. You will find ringtones that match your personality, whether you prefer humorous lines or iconic movie quotes.

Furthermore, the app is regularly updated with new content. This means you will never run out of fresh options. It also works offline after the initial download, so you do not need an internet connection to switch ringtones later.

For more useful tips on customizing your phone, check out our guide on WhatsApp auto-reply tricks or explore other app reviews on our site.

Final Thoughts

Personalizing your smartphone does not have to be complicated or expensive. With the dialogue caller ringtone app, you can inject fun and creativity into your daily calls. The installation process is quick, and the interface is intuitive. Even if you are new to custom ringtones, you will find this app easy to master.

So, why settle for a dull ringtone? Download the app today and make every incoming call an event. If you have any questions or run into issues, leave a comment below. We are happy to help. Do not forget to share this post with friends who love customizing their phones.

Continue Reading

Trending