Connect with us

How To

5 Free Local LLM Projects That Run Fine on a Slow Laptop

Published

on

local LLM projects

Your Old Laptop Isn’t Useless for AI

You don’t need a $3,000 gaming rig to play with artificial intelligence. That’s a hard pill to swallow for anyone who’s watched benchmark videos of massive GPUs chewing through models. But here’s the truth: there’s a whole ecosystem of local LLM projects built for machines that most people would call “slow.”

I’m talking about the kind of laptop that struggles with a dozen browser tabs. The one that whirs like a jet engine when you open a PDF. These projects are designed for that hardware, and they’re all free.

Before we dive in, a quick reality check. A 4GB RAM machine won’t run a 70-billion-parameter model. But it can absolutely run a 1-3 billion parameter model, and that’s enough for some genuinely useful things. Here’s what actually works.

1. Ollama: The Easiest Way to Start

Ollama is the gateway drug of local AI. It’s a command-line tool that downloads, runs, and manages models with a single command. No Python environment. No dependency hell. Just install and type.

The magic is in the model library. You can pull lightweight versions like Llama 3.2 1B or Phi-3 Mini, which are designed to run on CPUs. On a modest laptop, you’ll get responses that are slower than ChatGPT but perfectly usable.

What you can do with it

  • Summarize long articles or documents
  • Draft emails and rewrite text
  • Run a local chatbot without any privacy concerns
  • Experiment with different models to see what fits your hardware

The best part? Ollama has a built-in API, so you can hook it up to other tools. Using AI chatbots offline becomes a real possibility, not just a pipe dream.

2. LM Studio: A GUI for the Rest of Us

If the terminal makes you nervous, LM Studio is your answer. It’s a desktop app that wraps everything in a clean interface. You browse models, download them, and chat — all without touching a command line.

LM Studio shines on lower-end hardware because it uses the llama.cpp engine under the hood. That’s the same optimized C++ implementation that powers most CPU-based inference. It squeezes every drop of performance out of your processor.

Here’s a pro tip: look for models with 4-bit quantization. These are compressed versions that trade a tiny bit of accuracy for massive memory savings. A 7B model at 4-bit can run on 8GB RAM, and smaller models fit in even less.

3. GPT4All: Privacy-First AI for Documents

GPT4All takes a different approach. It’s not just a chat interface — it’s a local document question-answering tool. You point it at a folder of PDFs or text files, and it can answer questions based on that content.

This is a killer feature for anyone who deals with lots of documents. Instead of skimming through 50 pages, you just ask. The models it uses are small enough to run on older hardware, and everything stays on your machine.

It’s also worth noting that GPT4All is completely free and open-source. No account, no API keys, no subscription. Just download and run.

Practical uses

  • Search through your own research papers
  • Build a personal knowledge base from your notes
  • Ask questions about manuals or instruction books

This is one of those local LLM projects that feels genuinely useful rather than just a tech demo.

4. PrivateGPT: For the Privacy Obsessed

PrivateGPT is the paranoid cousin of GPT4All. It’s built around one core idea: your data never leaves your computer. It uses a technique called retrieval-augmented generation (RAG) to answer questions about your documents.

The setup is more involved than the other options. You’ll need some familiarity with Python and the command line. But if you’re willing to put in the effort, you get a fully private AI assistant that works with your files.

It runs on CPU-only machines, though you’ll want at least 8GB of RAM for comfortable performance. The original version was a proof-of-concept, but the project has evolved significantly. There are now simpler forks and wrappers that make installation easier.

If privacy is your top concern, this is the gold standard. But if you’re new to this, start with GPT4All first.

5. KoboldCPP: The Writer’s Friend

KoboldCPP is a fork of llama.cpp with a focus on creative writing. It’s designed for people who want to use AI for fiction, roleplay, or any kind of long-form text generation.

What sets it apart is the interface. It has a rich text editor with features like memory, world info, and author’s notes. These let you maintain consistency across long stories — something that’s genuinely hard to do with a plain chatbot.

The performance is excellent on older hardware because it inherits all the optimizations from llama.cpp. You can run it with models like Mistral 7B at 4-bit quantization, which is a sweet spot for quality versus resource usage.

Why writers love it

  • Maintain character consistency over long narratives
  • Set up lore and world-building elements
  • Generate multiple continuations and pick the best one

Even if you’re not a writer, it’s a fun way to experiment with running AI on old hardware. The creative constraints make the limitations of small models less noticeable.

How to Make the Most of Limited Hardware

Before you download everything, here are a few practical tips that will save you hours of frustration.

Check your RAM first

RAM is the bottleneck. A 1-3B model needs about 2-4GB of RAM. A 7B model at 4-bit needs 4-6GB. If you have 8GB, you can run most small models. If you have 4GB, stick to the smallest ones.

Use quantized models

Quantization is your best friend. It reduces model size by up to 75% with minimal quality loss. Look for models with Q4_K_M or Q5_K_M in the filename. These are the sweet spots.

Close everything else

This sounds obvious, but it matters. Close your browser, kill background apps, and give the model all available memory. The difference is night and day.

Experiment with context length

Smaller context windows use less memory. If you’re running out of RAM, reduce the context length in the settings. You’ll lose the ability to process long documents, but you’ll gain speed and stability.

These projects prove that free AI projects for laptops are more than just toys. They’re genuinely useful tools that respect your privacy and your wallet. For more ideas, check out self-hosting AI services at home — there’s a whole world of possibilities beyond chatbots.

So dust off that old laptop. Install one of these tools. You might be surprised at what it can do.

Continue Reading
Click to comment

Leave a Reply

Your email address will not be published. Required fields are marked *

Social Media

Meta’s Pocket app lets you vibe-code games with AI — it’s now live in the US

Published

on

Meta Pocket app

What is the Meta Pocket app?

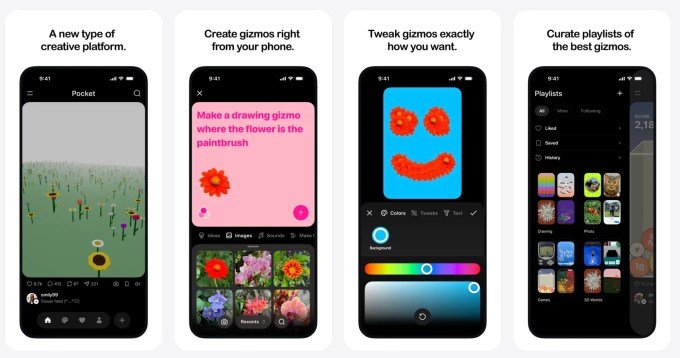
Meta’s experimental gaming app, Pocket, is officially rolling out to everyone in the United States. The app quietly launched in Brazil last month as a test market, and now it’s crossing borders. With Pocket, you can generate small, interactive games using simple AI prompts — no coding skills required. The results appear in a scrollable feed, much like TikTok but for playable mini-games.

These aren’t static images or basic animations. The games respond to touch and the tilt of your phone. They can play sound effects, include clips of your favorite songs, and even pull photos from your camera roll or access your camera. It’s a full sensory experience, packed into a mobile app.

How does vibe-coding work in Pocket?

The term “vibe-coding” might sound like jargon, but it’s actually straightforward. You type a prompt describing a game idea — say, “a maze where you tilt your phone to guide a ball” — and the AI builds it. You can then share your creation on your profile, where others can save it, remix it into something new, or simply repost it.

Meta calls these creations “gizmos,” a nod to the team behind the vibe-coded gaming platform Gizmo that Meta acquired earlier this year. That acqui-hire brought in the talent that built Gizmo, and now their work lives on inside Pocket.

What makes Pocket different from other AI apps?

Most AI apps focus on generating images or text. Pocket is built for play. It’s a social feed where the content isn’t passive — it’s interactive. You’re not just scrolling; you’re tilting, tapping, and triggering sounds. That’s a fundamentally different experience from typing a prompt into a chatbot and waiting for a response.

Meta’s broader push into standalone AI apps

Pocket is just the latest move in Meta’s strategy to make AI creation tools mainstream. Earlier efforts included AI-generated images in the Meta AI app and AI video creation through an experimental app called Vibes. Now Pocket joins a growing lineup of standalone mobile apps from Meta.

CEO Mark Zuckerberg has been vocal about this shift. On the July earnings call, he told analysts: “Earlier this year, we shipped Instagram Instants. We also just launched Forum, a stand-alone Groups app, and Seller, a stand-alone Marketplace app. I expect it to become a lot easier to ship new apps.” He added that Meta is “planning to build out more ideas and use our recommendation systems to scale them.”

That’s a notable change in how Meta operates. Instead of cramming every feature into Facebook or Instagram, the company is spinning out focused apps at a rapid clip. AI-enabled software development is making this possible, Zuckerberg said — it’s simply faster to test and ship new ideas now.

What else has Meta shipped recently?

Beyond Pocket, Meta has launched:

  • Instagram Instants — a feature for quick, ephemeral sharing
  • Forum — a standalone app for Groups
  • Seller — a standalone Marketplace app
  • AI bedtime stories — an experimental feature for kids’ storytelling
  • Meta AI for Mac — a desktop version of its AI assistant

That’s a lot of new products in a short window. And Pocket is the one getting the most attention right now.

What happens to the original Gizmo app?

With Pocket’s launch, Meta is shutting down the original app acquired from Atma Sciences. Gizmo, as it was known, is being sunset. Josh Siegel, the founder of Atma Sciences, shared his thoughts on X: “It’s bittersweet to shut down Gizmo, a labor of love by so many people for the last couple years, but I’m excited for Pocket and what’s next.” He also reflected on his journey, saying, “Starting a company is something I wanted to do for a long time, and it was way more fun than I imagined.”

That’s the reality of acquisitions — the original product often fades, but the team and ideas live on in the new platform. For fans of Gizmo, Pocket is the next chapter.

Why this matters for the future of AI gaming

Pocket isn’t just a toy. It’s a signal of where Meta thinks AI creation is headed. The company is betting that everyday users want to make things, not just consume them. And with AI handling the heavy lifting, the barrier to entry is nearly zero.

Will Pocket become a hit? Hard to say. But the pattern is clear: Meta is throwing ideas at the wall, seeing what sticks, and using AI to speed up the process. If vibe-coding games catch on, Pocket could be the start of something bigger. If not, Meta will simply move on to the next experiment.

Either way, US users can now try Pocket for themselves. Open the app, type a prompt, and see what you can create. The feed is waiting.

Continue Reading

How To

How to Download Music to Apple Watch for Offline Listening

Published

on

download music to Apple Watch

Why Bother With Music on Your Wrist?

There’s something liberating about leaving the house without your iPhone. No pocket bulge, no fear of dropping it mid-run. Your Apple Watch can hold a decent music library, and with Bluetooth headphones, it becomes a standalone jukebox.

Both Apple Music and Spotify support offline playback on the watch. That means your favorite tracks stay with you, even when the cellular signal doesn’t. Here’s how to set it all up.

Start With Your iPhone: The Classic Sync Route

The easiest way to get music onto your watch is through your iPhone. It gives you granular control over what gets transferred. You pick the albums and playlists; the watch does the rest.

Adding Music Through the Apple Watch App

Apple’s sync process is straightforward, but it’s hidden inside the Watch app. Follow these steps:

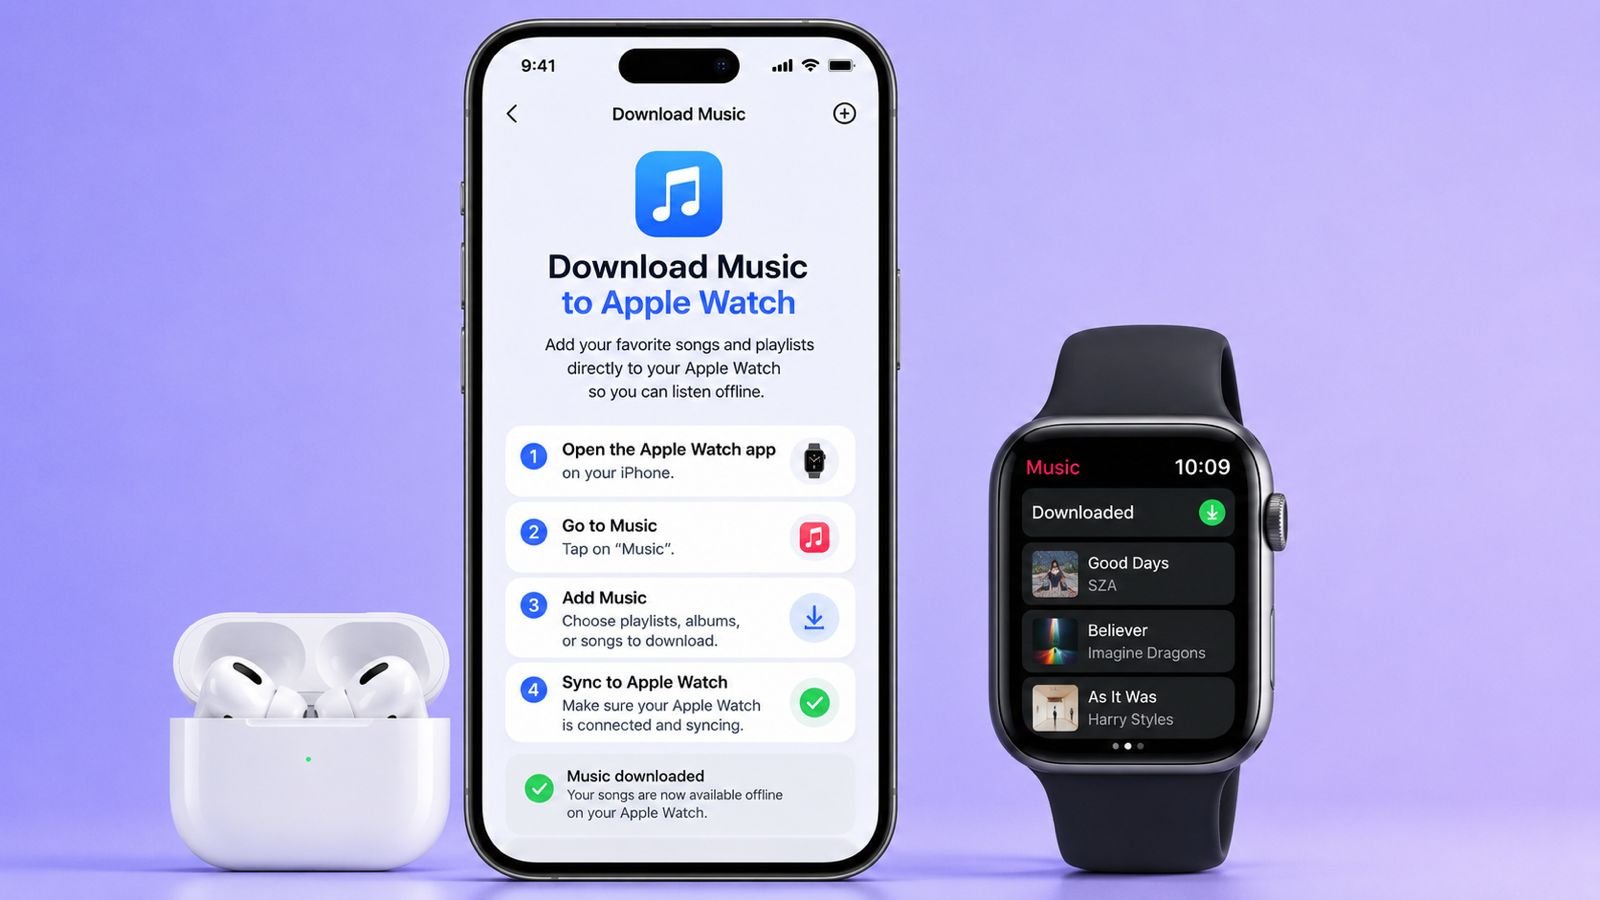
  1. Open the Apple Watch app on your iPhone.
  2. Tap My Watch at the bottom.
  3. Scroll down and select Music.
  4. Tap Add Music under the playlists section.
  5. Browse through your library and pick what you want.
  6. Tap the + button next to each item.

Keep the watch close to the iPhone during the transfer. The sync happens automatically when both devices are within range. Large playlists take longer, so be patient.

Create a Dedicated Watch Playlist

Syncing your entire library is overkill. Your watch has limited storage. Instead, build a playlist specifically for offline use. Open the Music app on your iPhone, create a new playlist, and drop in the tracks you actually listen to.

Make one for the gym — high-energy stuff. Make another for your commute. This keeps the watch organized and ensures you’re not wasting space on songs you skip anyway.

Download Directly on Apple Watch (No iPhone Needed)

Apple Music subscribers have a trick up their sleeve: direct downloads on the watch itself. If you have a cellular model, you can browse and download music without ever touching your phone.

Find and Add Music on the Watch

Here’s how it works:

  1. Open the Music app on your Apple Watch.
  2. Browse the Home screen for recommendations.
  3. Tap Search to find something specific.
  4. Open the album or playlist you want.
  5. Tap the More Options button (the three dots).
  6. Select Add to Library.

Wait for the confirmation. At this point, the music is added but not downloaded. Streaming still requires an internet connection.

Download for Offline Playback

Adding and downloading are two different things. To actually store music on the watch:

  1. Open the album or playlist you just added.
  2. Tap the More Options button again.
  3. Choose Download.
  4. Wait for the progress ring to complete.

Once the download finishes, the music plays without any connection. Perfect for workouts, hikes, or any time you want to ditch the phone.

Let Apple Music Auto-Fill Your Watch

Apple Music can also take the wheel. If you haven’t chosen your own music, the watch may automatically sync recently played songs or recommended tracks based on your listening history. It’s a decent fallback for new users who don’t know where to start.

Spotify: Premium Required, But Worth It

Spotify works on Apple Watch, but there’s a catch: you need a Spotify Premium subscription. Free accounts can’t download music for offline listening. If you’re a Premium user, here’s the drill:

  1. Open the Spotify app on your Apple Watch.
  2. Swipe left to access Your Library.
  3. Choose a playlist or album.
  4. Tap the three dots next to it.
  5. Select Download to Apple Watch.

Wait for the download to finish. Then you’re free to play those tracks without a connection. Just remember: watch storage fills up fast with Spotify downloads. Keep your selections small and focused.

Set Up a Workout Playlist for Automatic Playback

If you use the Workout app, you can have it start your favorite playlist automatically when you begin a session. No fumbling with the Music app mid-run. Here’s how to set it up:

  1. Open the Apple Watch app on your iPhone.
  2. Tap Workout.
  3. Scroll to Workout Playlist.
  4. Select the playlist you want to use.

Now, every time you start a workout, the music kicks in automatically. It’s one less thing to think about when you’re trying to hit your pace.

Connect Bluetooth Headphones and Manage Storage

Downloaded music is useless without a way to hear it. Pair your Bluetooth headphones or speakers directly with the watch. Put them in pairing mode, then:

  1. Open Settings on the watch.
  2. Tap Bluetooth.
  3. Wait for your device to appear.
  4. Tap it to connect.

Once paired, audio routes to your headphones automatically. This is the setup that makes phone-free runs possible.

Free Up Space When Needed

Watch storage is precious. If you need to remove music, do it from the iPhone:

  1. Open the Apple Watch app.
  2. Go to My Watch > Music.
  3. Tap Edit.
  4. Hit Delete next to any items you no longer need.

Removing old playlists makes room for new ones. It also keeps the watch from getting sluggish.

Watch Battery During Downloads

Downloading music eats battery. If you’re transferring a large playlist, consider doing it while the watch is charging. This prevents unnecessary drain and ensures the download completes without interruption.

When Downloads Fail: Quick Troubleshooting

Most of the time, downloads just work. But when they don’t, run through this checklist:

  • Check available storage on the watch.
  • Keep the watch close to the iPhone during sync.
  • Confirm your internet connection is stable.
  • Verify your Apple Music or Spotify Premium subscription is active.
  • Restart both devices if nothing else works.
  • Make sure both devices are updated to the latest software.

These simple checks resolve the vast majority of issues. If problems persist, it’s worth checking Apple’s support pages for known issues.

Final Thoughts

Downloading music to Apple Watch is a small setup that pays off big. Whether you’re syncing from your iPhone, downloading directly, or using Spotify Premium, the result is the same: your music goes where you go, without the phone.

Start with a small playlist, pair your headphones, and test it out. Once you experience a phone-free run with your favorite tracks, you won’t go back.

Continue Reading

How To

I printed multicolor designs without an AMS and saved hundreds of dollars

Published

on

multicolor 3D printing without AMS

Why I skipped the AMS

For years, I put off buying a 3D printer. The cost, the learning curve, the mess—it all felt like too much. When I finally took the plunge, I didn’t spring for the fancy Bambu Lab AMS or Elegoo‘s multi-color system. I figured I’d never need them. Multicolor printing, I thought, was wasteful and slow. Why bother?

Then I saw it. A stunning multicolor dragon on MakerWorld. A vibrant lithophane on a 3D printing subreddit. My resolve crumbled. I wanted those colors. But I didn’t want to drop another $300+ on an AMS.

So I started experimenting. Turns out, you can get gorgeous multicolor prints without the expensive hardware. Here’s how I did it—and how you can too.

The manual filament swap method

The simplest trick? Pause the print, swap the filament, resume. It sounds primitive, but it works.

Most slicers—like Cura or PrusaSlicer—let you insert a “pause at height” or “filament change” command. You set the layer, the printer stops, you pull out the old spool, push in the new one, and hit resume. The result? Clean color transitions, no AMS required.

Tips for clean swaps

  • Purge thoroughly: After swapping, extrude a bit of filament to clear the nozzle. Otherwise, you’ll get blobs or color bleed.
  • Use a prime tower: It catches residual filament and keeps your model clean.
  • Plan your layers: Swap at natural boundaries—like where the base meets the body—to hide the transition.

This method is perfect for prints with a few color changes. It’s not fast, but it’s cheap. And honestly, watching the colors appear layer by layer is oddly satisfying.

Painting: the underrated alternative

Another route? Paint your prints. I know, I know—it sounds like cheating. But hear me out.

Print the model in a neutral color, then use acrylic paints or markers to add details. This gives you unlimited colors, zero waste, and no extra hardware. I’ve painted everything from miniatures to plant pots, and the results often look better than filament swaps.

Plus, painting is relaxing. You can do it while watching TV. No printer noise, no failed swaps, just you and a brush.

What you’ll need to start

  • Acrylic paints (a basic set costs under $15)
  • Fine brushes or paint markers
  • A clear coat spray to seal the finish

It’s not for everyone. If you hate crafting, this might feel like a chore. But if you enjoy hands-on projects, it’s a game-changer—and it costs pennies compared to an AMS.

Multi-part printing: assemble your colors

Here’s a trick I wish I’d known sooner: print each color as a separate part, then glue them together.

Say you want a red and blue logo. Instead of one print with color changes, you print the red base and the blue emblem separately. Then you snap or glue them together. No pauses, no swaps, no purge towers. Just clean, solid colors.

This works best for models with distinct sections. Think signs, coasters, or mechanical parts. You can design the pieces in your slicer or use a tool like Tinkercad to split them.

The downside? You need to design with assembly in mind. But once you get the hang of it, it’s incredibly efficient.

Is an AMS really worth it?

Let’s be real: the AMS systems are impressive. They auto-swap filaments, handle multiple colors, and even manage supports. But they’re also expensive, bulky, and—for many hobbyists—overkill.

If you’re printing functional parts, like brackets or gears, you probably don’t need multicolor at all. And if you do want color, the techniques above cover most needs.

That said, if you’re printing complex models with dozens of color changes, an AMS will save you time and frustration. It’s a trade-off: money for convenience.

My final verdict

I’ve saved hundreds of dollars by skipping the AMS. My multicolor prints aren’t perfect—there’s the occasional string or a slightly off swap—but they’re mine. And they cost me nothing extra.

If you’re on the fence, start with manual swaps. You’ll learn a lot about your printer and your filament. Then, if you still crave the convenience, you can always upgrade later.

Happy printing—and remember, you don’t need the priciest gear to make something beautiful.

Continue Reading

Trending