Connect with us

How To

Unlock Your Creative Side with the Parallax Live Wallpaper App

Published

on

Unlock Your Creative Side with the Parallax Live Wallpaper App

Are you tired of a static, boring home screen? The Parallax Live Wallpaper app offers a fresh way to personalize your smartphone. It uses motion sensing to create a 3D depth illusion that responds when you tilt your device. This turns your screen into an interactive canvas, making everyday use feel more dynamic.

What Makes the Parallax Live Wallpaper App Stand Out?

This application goes beyond simple images. It delivers a true 3D live wallpaper experience. When you move your phone, the background shifts, mimicking real-world depth. This effect is often seen in high-end games, but now it’s available for your home screen. The app includes over 1,000 options, from abstract cubes to spiraling tunnels.

Moreover, the Parallax Live Wallpaper app is designed for performance. It automatically pauses when your phone is idle. This smart feature prevents battery drain, so you can enjoy animated backgrounds without worrying about power loss. It’s a practical choice for users who want style without sacrificing usability.

Key Features of the 3D Live Wallpaper Experience

Stunning Visual Effects and Depth Illusion

The core appeal lies in the depth illusion. Whether you choose a tunnel theme or a cosmic scene, the motion effect feels immersive. The app also supports video, GIF, and ultra HD animated backgrounds. This variety ensures you can match any mood or aesthetic.

In addition, the app works seamlessly with other launchers and themes. You can combine it with custom icons or widgets for a fully personalized look. The dynamic wallpaper adapts to your screen, whether on the home screen or lock screen.

Battery-Friendly Design

Many live wallpapers consume too much power. However, the Parallax Live Wallpaper app includes a sleep function. When your device is inactive, the animation stops. This means you get the visual appeal without constant battery drain. It’s a clever balance between beauty and efficiency.

How to Download and Install the App

Getting started is straightforward. First, scroll down to find the download link on the official page. Then, install the app on your device. After opening it, press the Apply button. On the next screen, select Change Wallpaper. Your chosen 3D live wallpaper will appear instantly.

For best results, ensure your phone supports live wallpapers. Most modern Android devices do. The app is free to download, making it accessible to everyone. Once installed, you can explore the vast library of animated backgrounds.

Looking for more ways to customize your device? Check out our guide on Android home screen tips. You might also enjoy other top live wallpaper apps for added inspiration.

Why You Should Try the Parallax Live Wallpaper App Today

This app transforms a simple phone into a creative tool. The depth illusion and motion effects make your screen feel alive. With over 1,000 wallpapers, you’ll never run out of options. From abstract art to nature scenes, there’s something for everyone.

Ultimately, the Parallax Live Wallpaper app is a great choice for anyone who values personalization. It’s easy to use, battery-friendly, and visually impressive. Download it today and see how a small change can refresh your entire phone experience.

Continue Reading
Click to comment

Leave a Reply

Your email address will not be published. Required fields are marked *

How To

Voice Screen Lock: How to Set a Unique Screen Lock on Your Android Phone Using Voice Commands

Published

on

Voice Screen Lock: How to Set a Unique Screen Lock on Your Android Phone Using Voice Commands

Are you tired of the same old pattern or PIN lock on your phone? What if you could unlock it just by speaking? That’s exactly what the Voice Screen Lock app offers. This tool transforms your Android phone lock into a voice-activated system, adding both convenience and a layer of novelty to your daily routine. In this guide, we’ll walk you through everything you need to know about setting up this unique screen lock.

What Makes Voice Screen Lock a Unique Screen Lock Option?

Most people rely on fingerprints, patterns, or passwords. However, a voice lock stands out because it’s completely hands-free. Imagine you’re cooking, driving, or your hands are full—just say the magic word, and your phone unlocks. This app records your voice command and uses it as the key. It’s not just secure; it’s also a fun way to impress your friends.

Building on this idea, the app is designed for simplicity. You don’t need to root your device or follow complex steps. It works on most modern Android smartphones. As a result, anyone can use it without technical expertise.

How to Download and Install the Voice Screen Lock App

To get started, you need to install the app from the Google Play Store. The process is straightforward and similar to downloading any other app. Follow these steps to set up your Android phone lock:

  1. Open the Google Play Store on your Android device.
  2. In the search bar, type “Voice Screen Lock” and press enter.
  3. Look for the official app by a trusted developer. Tap on it to open the download page.
  4. Click the “Install” button. The app will download and install automatically.
  5. Once installed, open the app to begin the configuration.

Alternatively, you can use the direct download link provided on the developer’s website. However, always ensure you’re downloading from a legitimate source to avoid malware.

Step-by-Step Guide to Setting Up Your Voice Lock

After installation, the real fun begins. Here’s how to configure your unique screen lock using the app:

Grant Necessary Permissions

First, the app will ask for permissions. This includes access to your microphone and the ability to override the lock screen. Grant these permissions so the app can function properly. Without them, the voice unlock feature won’t work.

Record Your Voice Command

Next, you’ll record a custom voice command. Choose a phrase that’s easy to remember but hard for others to guess. For example, “Open sesame” or “Unlock now.” Speak clearly into the microphone. The app will save this as your unique key.

Test the Setup

After recording, lock your phone manually. Then, say your voice command. If everything is set correctly, the screen should unlock instantly. If it doesn’t, repeat the recording process. Make sure there’s no background noise interfering.

This means that the app uses voice recognition technology to match your spoken phrase. It’s not perfect—background noise can sometimes cause errors—but in quiet environments, it works reliably.

Why You Should Use a Voice Lock for Your Android Phone

There are several benefits to using a voice unlock app. First, it adds an extra layer of security. Even if someone sees your pattern, they can’t mimic your voice perfectly. Second, it’s incredibly convenient. You don’t need to touch the screen, which is useful when your hands are dirty or wet.

Furthermore, it’s a great accessibility tool. People with motor disabilities may find it easier to unlock their phone with voice commands. The app also provides a fun, futuristic experience that makes your device feel smarter.

However, keep in mind that voice locks aren’t as secure as biometric methods like fingerprints. A recording of your voice could potentially unlock the phone. Therefore, use this feature in low-risk situations or as a secondary lock.

Tips for Maximizing Your Voice Screen Lock Experience

To get the most out of this unique screen lock, consider these tips:

  • Choose a unique phrase: Avoid common words like “hello” or “phone.” Use something personal.
  • Speak consistently: The app works best when you say the command in the same tone and speed each time.
  • Update regularly: Check for app updates to ensure compatibility with your Android version.
  • Combine with other locks: Use the voice lock alongside a PIN or pattern for added security.

In addition, share this app with friends and family. They might enjoy the hands-free convenience too. For more tech tips, check out our guide on boosting your phone volume or read about changing WhatsApp font size.

Final Thoughts on Voice Screen Lock

The Voice Screen Lock app is a creative solution for anyone wanting a hands-free Android phone lock. It’s easy to set up, fun to use, and adds a touch of innovation to your daily life. While it may not replace traditional locks for everyone, it’s definitely worth trying as a secondary option.

Remember, phone security is crucial. A voice lock is just one tool in your arsenal. Stay updated with the latest apps and security tips by following our blog. Try the app today and enjoy the convenience of unlocking your phone with just your voice.

Continue Reading

How To

YouTube Introduces Unique Handle Channel Identifier: What Creators Need to Know

Published

on

YouTube Introduces Unique Handle Channel Identifier: What Creators Need to Know

YouTube is developing a fresh way for users to identify and connect with channels: a YouTube handle channel identifier. This upcoming feature, signaled by the familiar @ symbol, promises to make searching for content and interacting with creators far more straightforward. As the world’s second most-visited website, YouTube continuously refines its platform, and this update is poised to simplify how audiences find their favorite channels.

Instead of relying solely on channel names or cumbersome URLs, each channel will soon have a distinct handle. This change is designed to eliminate confusion and ensure that when you mention a creator, you are linking to the right person. The rollout is expected to enhance the overall user experience across comments, community posts, and video descriptions.

How the YouTube Handle Channel Identifier Works

The core idea behind the YouTube handle channel identifier is to give every channel a unique, searchable tag. Handles, which start with the @ symbol, are already common on other social platforms. YouTube is now adopting this system to streamline its own ecosystem. If you already have a personalized URL for your channel, the platform will reserve that as your handle by default. However, you retain the flexibility to change it if you prefer something different.

Once the feature is fully active, each handle will be one of a kind. This uniqueness means that when you see a handle on a Short, a channel page, or in a comment, you can be certain you are interacting with the correct creator. For subscribers and followers, this makes finding and engaging with your content much easier. The handle will appear prominently across YouTube, making your channel instantly recognizable.

In addition to boosting visibility, the handle system accelerates interactions. Creators and viewers will be able to mention each other quickly in comments, community posts, and video descriptions. This ease of use is expected to foster more engagement and help creators reach new audiences. Previously, customized URLs required a channel to have at least 100 subscribers. Now, any YouTube account holder can choose a handle, lowering the barrier for new creators.

When Will the Handle Feature Roll Out?

According to available reports, the YouTube handle channel identifier will become available to users in the coming months. The feature will be usable across the comment section, mentions, and YouTube Shorts. However, YouTube is considering several factors during the rollout, including subscriber count, overall channel presence, and whether a channel is active or inactive.

For those who do not select a handle before the deadline, YouTube will automatically assign one. The good news is that you can change this auto-assigned handle later through YouTube Studio. The platform will notify eligible users via email and an in-app notification in YouTube Studio when it is time to choose their handle. This process ensures that everyone gets a chance to claim their preferred identifier.

What This Means for Creators and Viewers

This new system represents a significant shift in how channels are identified and discovered. For creators, the YouTube handle channel identifier offers a simple, memorable way to build a brand. It eliminates the need for complex URLs and makes cross-platform promotion easier. Viewers, on the other hand, benefit from a cleaner search experience. Instead of wading through similar names, they can directly search for or type an @handle to land on the exact channel they want.

Another advantage is the increased potential for collaboration. With handles, mentioning another creator in a video description or community post becomes a direct link, driving traffic and fostering community. This feature aligns with YouTube’s broader goal of improving user engagement and discoverability. As the platform continues to evolve, tools like this help maintain its position as a leader in video sharing.

To stay updated on this and other YouTube changes, check out our guide on how to play YouTube in the background. For more insights into platform updates, explore our article on WhatsApp’s latest features.

Building on this, the handle system is just one of many improvements designed to streamline the user experience. As YouTube rolls out this feature, creators should prepare by brainstorming potential handles that align with their channel’s identity. The shift from subscriber-gated URLs to open handle selection democratizes access, giving every creator a fair chance to establish a unique presence.

In conclusion, the YouTube handle channel identifier is a welcome addition that simplifies navigation and enhances interaction. Whether you are a seasoned creator or just starting out, this feature will make your channel more accessible and recognizable. Keep an eye on your YouTube Studio notifications to claim your handle as soon as it becomes available.

Continue Reading

How To

Master Do Not Disturb on Android: Your Ultimate Guide to Silencing Distractions

Published

on

Master Do Not Disturb on Android: Your Ultimate Guide to Silencing Distractions

Is your phone constantly buzzing with alerts you don’t need? You are not alone. The Do Not Disturb on Android feature is a powerful tool designed to give you back control over your attention. It goes far beyond simply muting your device, offering a smart way to filter out the noise while letting through what truly matters. This guide will walk you through everything from the basics to advanced customization, helping you create a quieter, more productive digital life.

Understanding Do Not Disturb vs. Silent Mode

Many people confuse Do Not Disturb with the traditional silent mode. While both reduce sound, they work in fundamentally different ways. Silent mode simply mutes all ringtones and notification sounds, but your screen still lights up with every incoming alert. The distraction remains visual.

Do Not Disturb on Android, however, is far more intelligent. It can completely suppress both sound and visual interruptions. Crucially, it allows you to create exceptions. You can let calls from your family ring through, allow alarms to sound, or permit notifications from a specific work app. This level of granular control makes it a superior choice for focused work, restful sleep, or uninterrupted travel.

How to Activate Do Not Disturb on Android

Getting started with Do Not Disturb on Android is simple, with a few different paths to activation. Whether you own a Samsung, Google Pixel, or another brand, the core steps are similar.

Using Quick Settings (Fastest Method)

The quickest way to enable the feature is through the Quick Settings panel. Simply swipe down from the top of your screen once or twice (depending on your device) to reveal the full tile menu. Look for the Do Not Disturb icon, which often looks like a circle with a line through it or a minus sign inside a circle. Tap it once to activate the feature immediately. Tap it again to turn it off.

Activating Through the Settings App

For those who prefer a more detailed approach, the Settings app offers full control. Navigate to Settings > Sound & vibration > Do Not Disturb. Here, you will find a “Turn on now” button at the top of the screen. This method is also your gateway to deeper customization.

Samsung and Google Pixel Specifics

On Samsung devices, the feature is tightly integrated with Modes and Routines. You can find the toggle in Quick Settings or within the main Settings menu under “Modes and Routines.” This allows for powerful automation based on your activity, like a “Work” or “Sleep” mode. On Google Pixel phones, the standard Android controls apply, but they also integrate with Focus Mode and Bedtime Mode found within the Digital Wellbeing settings. These offer preset configurations for specific scenarios.

Customizing Your Do Not Disturb Settings

The true power of Do Not Disturb on Android lies in its customization. You can tailor it to fit your exact needs, ensuring you never miss a critical alert while blocking everything else.

Managing Calls, Messages, and App Exceptions

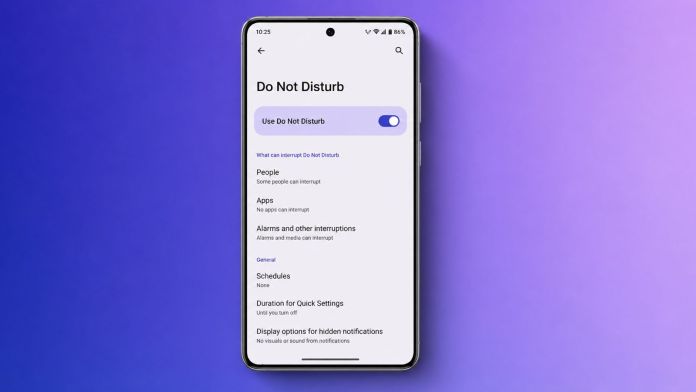
Within the Do Not Disturb settings, you will find options to control who can reach you. Under the “People” section, you can allow calls and messages from anyone, only your starred contacts, or a specific list of contacts. You can also choose to block everyone entirely. A particularly useful feature is “Allow repeat callers.” If the same person calls twice within 15 minutes, their second call will break through, which is invaluable for emergencies.

For apps, navigate to the “Apps” section within Do Not Disturb settings. You can add individual applications, like your messaging or calendar app, and configure the types of notifications they can show. This ensures that while most apps are silenced, critical ones—like a work email client or a family group chat—can still get your attention.

Setting Up Automatic Schedules

Manually toggling Do Not Disturb on Android can become tedious. This is where scheduling shines. You can create time-based rules that activate automatically. For example, you can set a schedule for every night from 11 PM to 7 AM. The phone will enter DND mode without you lifting a finger.

Building on this, Android also allows you to schedule DND during calendar events. If you have a meeting in your Google Calendar, your phone can automatically silence itself for its duration. To set this up, go to Settings > Sound & vibration > Do Not Disturb > Schedules > Add more > Event. Choose your preferred calendar and let the phone handle the rest. This is a game-changer for maintaining professionalism during important appointments.

Troubleshooting Common Do Not Disturb Issues

Sometimes, things don’t work as expected. If your phone is still buzzing despite DND being active, a few quick checks can help. First, review your exceptions list. You may have accidentally allowed a contact or app to bypass the silence. Second, restart your phone to clear any temporary software glitches. Third, ensure your Android software is up to date, as updates often fix bugs related to system features. If the problem persists, booting into Safe Mode can help identify if a third-party app is interfering.

As a final step, you can reset your app preferences. Go to Settings > System > Reset options > Reset app preferences. This will not delete your data but will restore default permissions for all apps, which can resolve conflicts.

Frequently Asked Questions

Will my alarm still ring with Do Not Disturb on?

Yes, by default, alarms are allowed to sound even when Do Not Disturb is active. You can disable this in the “Alarms & other interruptions” section of the DND settings if needed.

Can I schedule Do Not Disturb for specific days?

Absolutely. When creating a time-based schedule, you can select which days of the week the schedule should be active. This is perfect for setting a work schedule from Monday to Friday.

Does Do Not Disturb block vibrations?

Yes, DND can block all vibrations, not just sounds. You can customize this in the settings to either allow or block vibrations for different types of interruptions.

Mastering Do Not Disturb on Android is about reclaiming your time and focus. By setting up the right schedules and exceptions, you can enjoy a phone that works for you, not against you. For more tips on managing your digital wellbeing, check out our guide on hiding WhatsApp blue ticks or learn how to stay safe from online scams.

Continue Reading

Trending