Connect with us

How To

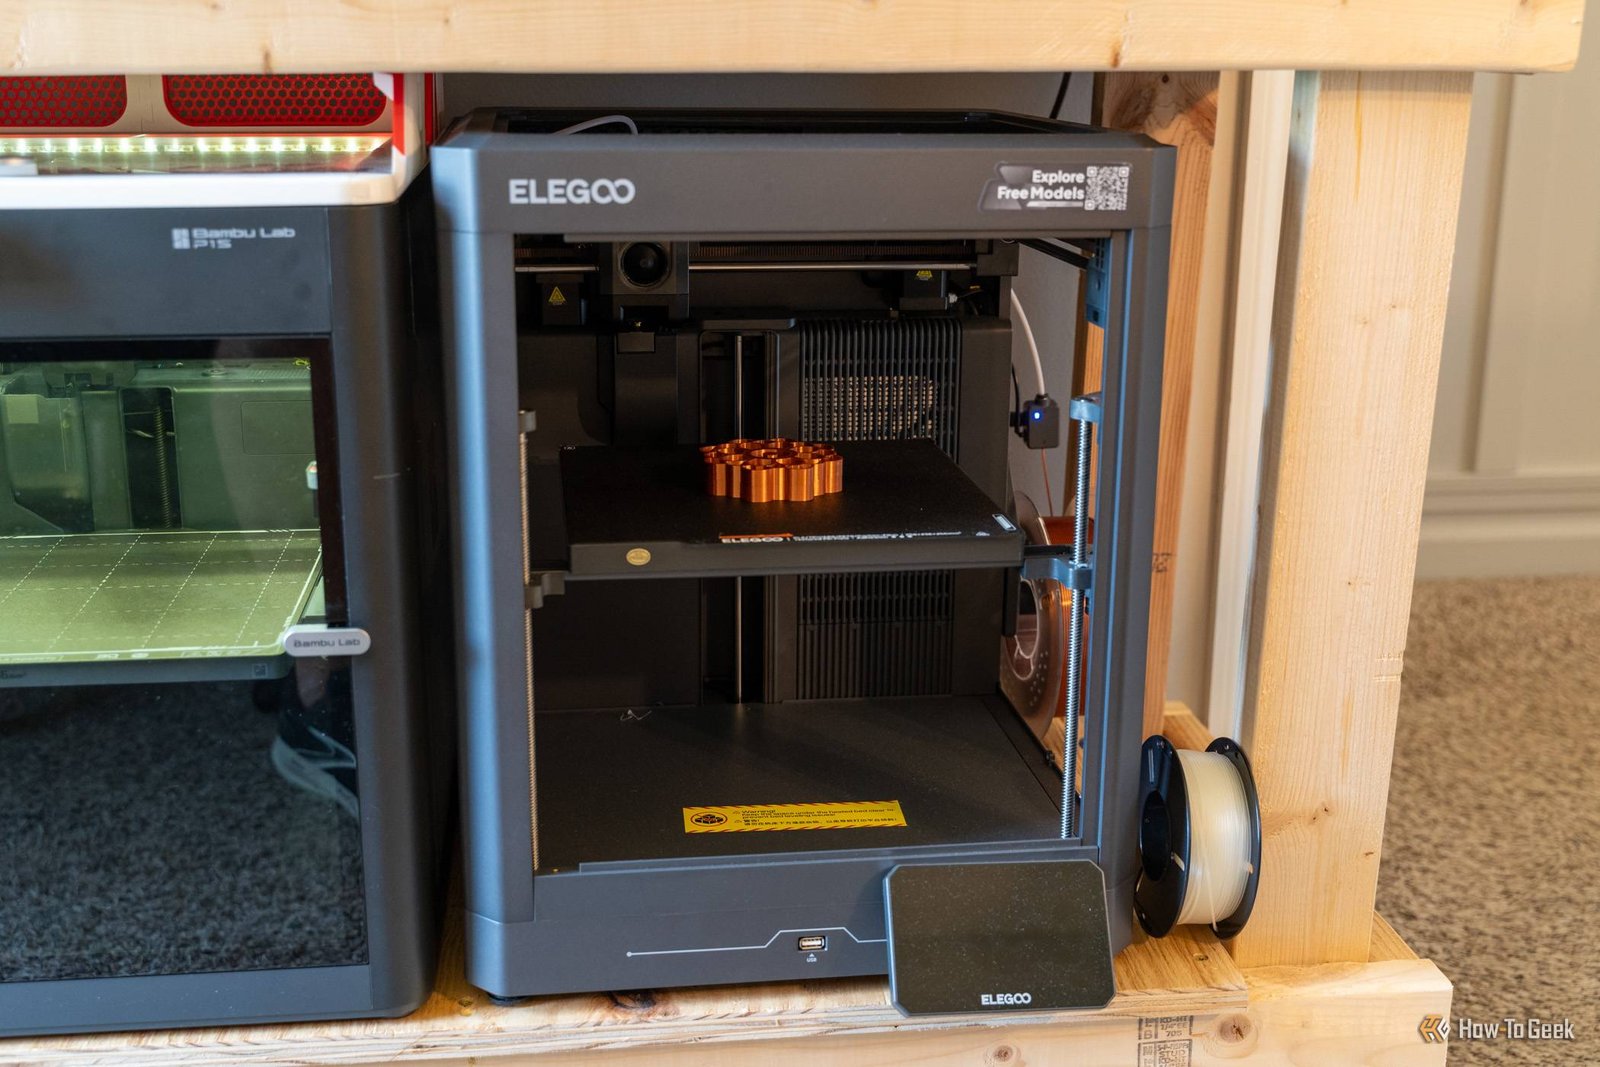
Elegoo Centauri 2 Review: The Best Budget CoreXY 3D Printer

Published

on

budget CoreXY 3D printer

Elegoo Centauri 2 Review: The Best Budget CoreXY 3D Printer

For years, the CoreXY design was the domain of enthusiasts willing to drop a grand or more. Elegoo just flipped that script. The Centauri 2 is a fully enclosed, fast, and surprisingly polished CoreXY machine that costs less than half that. It’s the kind of printer that makes you wonder why you ever considered a bedslinger.

I’ve spent weeks with the Centauri 2, and it’s not just a good budget printer. It’s a genuinely great printer, period. Here’s why it’s the best budget CoreXY 3D printer you can buy right now.

What Makes the Centauri 2 Different

CoreXY printers move the print head on a belt-driven gantry system, which allows for faster, more precise movement than the traditional Cartesian design. That’s why they’re the standard for high-end machines. Elegoo brought that same architecture to the budget segment without cutting corners that matter.

The Centauri 2 ships fully assembled. No all-night build sessions, no bags of loose screws, no head-scratching over misaligned rails. You unbox it, plug it in, and run through a quick setup wizard. That alone is worth something. Most printers in this price range require hours of assembly and calibration before you get a single successful print.

It’s also enclosed, which is rare at this price. That enclosure keeps temperatures stable for materials like ABS and PETG, and it makes the printer quieter. It’s not silent, but it’s unobtrusive enough to run in a shared space.

Print Speed and Quality: The Real Test

Specs are one thing. Real-world results are another. The Centauri 2 claims a max speed of 500 mm/s, and while you won’t run it at that for most prints, it handles 200-250 mm/s with ease. That’s roughly three times faster than a typical budget printer.

I printed a Benchy in under 25 minutes at 0.2mm layer height, and the quality was impressive. Sharp corners, clean overhangs, and no visible layer lines at a glance. The 0.4mm nozzle handles detail work well, and the auto-bed leveling means you don’t have to fiddle with manual leveling every few prints.

For a budget CoreXY 3D printer, the Centauri 2 punches well above its weight. It’s not a high-end 3D printer, but it’s close enough that most hobbyists won’t notice the difference.

Build Volume and Features

The Centauri 2 offers a build volume of 220 x 220 x 220 mm, which is enough for most functional parts, cosplay props, and prototypes. It’s not massive, but it’s practical. The magnetic flexible build plate makes part removal a breeze — just flex it and pop your print off.

Other notable features include:

  • A 4.3-inch touchscreen interface that’s actually responsive, not a laggy afterthought
  • Wi-Fi connectivity with remote monitoring via the Elegoo app
  • Filament runout sensor and resume-print functionality
  • Dual Z-axis screws for improved stability

These aren’t just checkboxes. The touchscreen is a genuine upgrade over the clunky rotary knobs on older budget machines. The app works well enough for starting prints and checking progress, though I wouldn’t rely on it for heavy file management.

Software and Slicing Experience

The Centauri 2 works with Elegoo’s own slicer, which is based on OrcaSlicer. That’s a good thing — Orca is one of the best open-source slicers out there, and the Elegoo version is well-configured out of the box.

You can also use Cura or PrusaSlicer if you prefer, but the Elegoo profiles are tuned for the machine. I stuck with the default profiles and got great results without tweaking. For a printer aimed at beginners and intermediate users, that’s the right call. Nobody wants to spend hours dialing in retraction settings on day one.

If you’re new to 3D printing, this is a huge plus. You can focus on learning the craft, not fighting the machine.

Value and Verdict

The Elegoo Centauri 2 is priced around $450, which is remarkable for a CoreXY machine with this feature set. Comparable printers from Bambu Lab or Prusa cost $800 or more. That price difference isn’t justifiable for most hobbyists, especially when the Centauri 2 delivers 90% of the performance.

Are there compromises? Sure. The camera quality is mediocre, the build plate is slightly smaller than some rivals, and the enclosure isn’t perfectly airtight. But none of these issues affect the core experience. It prints fast, it prints clean, and it doesn’t break the bank.

If you’re in the market for a new printer and don’t want to spend a fortune, the Elegoo Centauri 2 is the best budget CoreXY 3D printer you can buy. It’s a no-brainer recommendation for beginners and a solid upgrade for anyone stuck on a slower, older machine.

For more options, check out our roundup of the best budget 3D printers or learn how to choose your first 3D printer.

Continue Reading
Click to comment

Leave a Reply

Your email address will not be published. Required fields are marked *

How To

I Forced My Pixel to Stay on 4G for a Week — the Battery Difference Was Ridiculous

Published

on

Pixel 4G battery life

Why I Finally Gave Up on 5G

Let me be blunt: my Google Pixel has become a battery anxiety machine. The dreaded low-battery warning pops up before I’ve even finished my morning commute, and I’ve spent months chasing phantom battery drains through menus and settings.

I’ve tried everything short of carrying a portable power station. Location Accuracy? Off. Adaptive brightness? Tuned. Background apps? Slaughtered. Nothing made a meaningful dent. Then a friend asked a simple question: why are you even on 5G?

I didn’t have a good answer. My coverage is patchy, and I rarely notice the speed difference for everyday tasks. So I decided to run an experiment. For seven full days, I locked my Pixel to 4G LTE and tracked every percentage point. The results genuinely surprised me.

The Numbers: 4G vs 5G Battery Drain

Before I get into the specifics, here’s the honest caveat: this is a real-world test, not a lab measurement. My daily usage — Spotify during commutes, heavy WhatsApp messaging, and endless Chrome scrolling — stayed mostly consistent throughout the week.

On 5G, my Pixel was averaging about 4.5 hours of screen-on time before hitting 15%. That’s the point where I’d start eyeing charging cables nervously. On 4G? That number jumped to nearly 6 hours. That’s a 33% improvement, and it’s not subtle.

The standby time was even more dramatic. Here’s what I tracked:

  • Overnight drain (8 hours): 5G cost me 12-14%. On 4G, it dropped to 4-5%.
  • Morning commute (45 min of music): 5G ate 8%. 4G used just 3%.
  • Heavy navigation session: 5G bled 18% in an hour. 4G managed the same trip with 11%.

Why 5G Wrecks Your Pixel’s Battery

This isn’t magic. It’s physics and radio engineering. 5G networks, especially in areas where coverage is thin, force your phone’s modem to work overtime. Your Pixel constantly scans for a stronger signal, switching between bands, and that process is a silent battery killer.

There’s also the heat factor. A phone that’s constantly hunting for 5G runs warmer, and heat accelerates battery degradation over time. You’re not just losing daily charge — you’re potentially shortening the lifespan of the battery itself.

For most people, the trade-off isn’t worth it. Streaming video, checking social media, and even video calls work perfectly fine on 4G. Unless you’re downloading massive files or playing competitive online games, you won’t feel the difference.

How to Force Your Pixel Onto 4G

Convinced? Here’s the annoying part: Google doesn’t make this easy. There’s no simple toggle that says “prefer 4G.” You have to dig into the developer options, which is a bit intimidating for casual users. Here’s the step-by-step process:

  1. Open Settings and scroll down to About Phone.
  2. Tap Build Number seven times. You’ll see a toast notification saying “You are now a developer!”
  3. Go back to Settings and enter SystemDeveloper Options.
  4. Scroll down to Networking and tap Preferred Network Type.
  5. Select LTE (or LTE/WCDMA, depending on your carrier).

That’s it. Your phone will stay locked to 4G until you change it back. If you want to revert, just repeat the steps and select “5G/LTE” or “Global.”

A Safer Alternative: Disable 5G in Settings

If developer options make you nervous, there’s a less invasive path. On recent Pixel models running Android 13 or 14, you can go to SettingsNetwork & InternetSIMsPreferred network type. Not every carrier exposes this option, but it’s worth checking before you dive into the developer menu.

One word of caution: after a system update or a SIM card swap, your phone might revert to 5G. It’s worth checking this setting every few weeks to make sure it stuck.

Should You Do This? The Honest Verdict

Here’s where I’ll push back against the hype. If you live in a major city with rock-solid 5G coverage, the battery difference might be smaller. My neighborhood has spotty signal, which exaggerates the drain. Your mileage will vary.

That said, the experiment changed my daily routine. I’ve kept my Pixel on 4G permanently. The extra hour of screen time is worth more to me than faster downloads I rarely use.

For those who want to dig deeper into battery optimization, I’ve written about how to fix Pixel battery drain and the best Pixel battery settings to change right now. If you’re considering a new phone, you might also want to check out our Google Pixel 8 vs Pixel 7 battery comparison.

At the end of the day, the best battery saver isn’t an app or a clever setting. It’s simply cutting off the network that’s working too hard. Give it a week. Your Pixel — and your sanity — will thank you.

Continue Reading

Social Media

Patreon’s 30 new features: Clips, Niches, and a discovery algorithm that finally favors small creators

Published

on

Patreon new creator features

Patreon’s big bet on community over chaos

Patreon just dropped a massive update — 30 new or revamped features aimed at fixing what its CEO calls a “failed promise” of the modern internet. The headline act? A short-form video tool called Clips and a discovery algorithm that no longer plays favorites with big creators.

For a platform that’s been quietly powering the creator economy since 2013, this is a loud statement. Patreon is positioning itself as the anti-social-media social network: less viral noise, more genuine fandom.

What is Patreon Clips? A TikTok-style tool for creators

The most buzzed-about feature is Clips, rolling out on iOS first. It turns a creator’s existing videos into short, shareable clips that can be downloaded and posted anywhere — TikTok, Reels, Shorts, you name it. Or creators can post them natively as Quips, Patreon’s own short-form post format.

Think of it as Patreon’s answer to the reality that discovery happens off-platform. Fans scroll TikTok, they find a creator, they follow the link to Patreon. Clips makes that loop smoother.

There’s also a clever preview angle: a tool in early testing pulls the most engaging segments from paid videos and shows them to potential subscribers. Another lets creators quote snippets of long written posts into Quips, which surface on the Home feed as free previews. It’s a taste before the purchase — and Patreon hopes it converts.

Adult content creators get native video and Quips too

Notably, these features aren’t just for PG-rated creators. Patreon is extending native video and Quips to adult (18+) content creators, a segment that has long been a significant part of its ecosystem.

Discovery algorithm revamp: smaller creators get a fighting chance

Here’s where Patreon is making a real structural change. Previously, its recommendation system suggested creators similar to ones you already liked — which sounds fine, until you realize it kept pushing the same big names.

The new algorithm compares individual posts by topic, craft, style, and theme. That means a niche illustrator with 500 patrons can surface alongside a mega-podcaster, as long as the work resonates. Patreon says this shift helps highlight smaller creators who were previously invisible in recommendations.

For fans, it means less digging. For creators, it’s a possible lifeline.

Niches: topic-based communities inside Patreon

Another major piece is Niches — dedicated, topic-based communities built around specific interests, subcultures, or fandoms. Instead of hunting across the site for every creator who posts about, say, watercolor painting or retro gaming, fans can find them clustered in one place.

Niches are in early testing, along with fan profiles. But the direction is clear: Patreon wants to be a destination, not just a payment processor.

The company is also adding Live Q&A support on creator livestreams, which are rolling out now.

Better analytics and payouts for creators

Patreon is beefing up its analytics with a granular earnings tab that breaks down revenue by tier and billing cadence. Membership insights now show counts for free trials, members in payment retry, and filters for active, gifted, or retrying members.

The Payouts tab gets a revamp too, showing a complete record of money flowing in and out. And coming soon: creator milestones — celebratory moments tied to community growth.

What’s next: anti-AI scraping and spam detection

Looking further out, Patreon’s roadmap includes anti-AI scraping tools, real-time spam detection, expanded auto-moderation, and additional verification measures. These are defensive moves, but they signal where the platform sees threats coming from.

What this means for creators

CEO Jack Conte didn’t mince words in his announcement: “Social media has created mass polarization, addiction, and made it increasingly difficult to build a creative community and business.”

That’s a direct shot at the attention economy. But Patreon isn’t abandoning the tools of that economy — it’s borrowing them (Clips, Quips) while building a moat around genuine community (Niches, better discovery).

Some of these features are still in early testing, so don’t expect everything to appear overnight. But over the next few months, creators should see a steady stream of updates.

For more on how creators are adapting to platform changes, check out our guide to creator monetization strategies and the latest on membership platform comparisons.

Continue Reading

How To

5 Free Local LLM Projects That Run Fine on a Slow Laptop

Published

on

local LLM projects

Your Old Laptop Isn’t Useless for AI

You don’t need a $3,000 gaming rig to play with artificial intelligence. That’s a hard pill to swallow for anyone who’s watched benchmark videos of massive GPUs chewing through models. But here’s the truth: there’s a whole ecosystem of local LLM projects built for machines that most people would call “slow.”

I’m talking about the kind of laptop that struggles with a dozen browser tabs. The one that whirs like a jet engine when you open a PDF. These projects are designed for that hardware, and they’re all free.

Before we dive in, a quick reality check. A 4GB RAM machine won’t run a 70-billion-parameter model. But it can absolutely run a 1-3 billion parameter model, and that’s enough for some genuinely useful things. Here’s what actually works.

1. Ollama: The Easiest Way to Start

Ollama is the gateway drug of local AI. It’s a command-line tool that downloads, runs, and manages models with a single command. No Python environment. No dependency hell. Just install and type.

The magic is in the model library. You can pull lightweight versions like Llama 3.2 1B or Phi-3 Mini, which are designed to run on CPUs. On a modest laptop, you’ll get responses that are slower than ChatGPT but perfectly usable.

What you can do with it

  • Summarize long articles or documents
  • Draft emails and rewrite text
  • Run a local chatbot without any privacy concerns
  • Experiment with different models to see what fits your hardware

The best part? Ollama has a built-in API, so you can hook it up to other tools. Using AI chatbots offline becomes a real possibility, not just a pipe dream.

2. LM Studio: A GUI for the Rest of Us

If the terminal makes you nervous, LM Studio is your answer. It’s a desktop app that wraps everything in a clean interface. You browse models, download them, and chat — all without touching a command line.

LM Studio shines on lower-end hardware because it uses the llama.cpp engine under the hood. That’s the same optimized C++ implementation that powers most CPU-based inference. It squeezes every drop of performance out of your processor.

Here’s a pro tip: look for models with 4-bit quantization. These are compressed versions that trade a tiny bit of accuracy for massive memory savings. A 7B model at 4-bit can run on 8GB RAM, and smaller models fit in even less.

3. GPT4All: Privacy-First AI for Documents

GPT4All takes a different approach. It’s not just a chat interface — it’s a local document question-answering tool. You point it at a folder of PDFs or text files, and it can answer questions based on that content.

This is a killer feature for anyone who deals with lots of documents. Instead of skimming through 50 pages, you just ask. The models it uses are small enough to run on older hardware, and everything stays on your machine.

It’s also worth noting that GPT4All is completely free and open-source. No account, no API keys, no subscription. Just download and run.

Practical uses

  • Search through your own research papers
  • Build a personal knowledge base from your notes
  • Ask questions about manuals or instruction books

This is one of those local LLM projects that feels genuinely useful rather than just a tech demo.

4. PrivateGPT: For the Privacy Obsessed

PrivateGPT is the paranoid cousin of GPT4All. It’s built around one core idea: your data never leaves your computer. It uses a technique called retrieval-augmented generation (RAG) to answer questions about your documents.

The setup is more involved than the other options. You’ll need some familiarity with Python and the command line. But if you’re willing to put in the effort, you get a fully private AI assistant that works with your files.

It runs on CPU-only machines, though you’ll want at least 8GB of RAM for comfortable performance. The original version was a proof-of-concept, but the project has evolved significantly. There are now simpler forks and wrappers that make installation easier.

If privacy is your top concern, this is the gold standard. But if you’re new to this, start with GPT4All first.

5. KoboldCPP: The Writer’s Friend

KoboldCPP is a fork of llama.cpp with a focus on creative writing. It’s designed for people who want to use AI for fiction, roleplay, or any kind of long-form text generation.

What sets it apart is the interface. It has a rich text editor with features like memory, world info, and author’s notes. These let you maintain consistency across long stories — something that’s genuinely hard to do with a plain chatbot.

The performance is excellent on older hardware because it inherits all the optimizations from llama.cpp. You can run it with models like Mistral 7B at 4-bit quantization, which is a sweet spot for quality versus resource usage.

Why writers love it

  • Maintain character consistency over long narratives
  • Set up lore and world-building elements
  • Generate multiple continuations and pick the best one

Even if you’re not a writer, it’s a fun way to experiment with running AI on old hardware. The creative constraints make the limitations of small models less noticeable.

How to Make the Most of Limited Hardware

Before you download everything, here are a few practical tips that will save you hours of frustration.

Check your RAM first

RAM is the bottleneck. A 1-3B model needs about 2-4GB of RAM. A 7B model at 4-bit needs 4-6GB. If you have 8GB, you can run most small models. If you have 4GB, stick to the smallest ones.

Use quantized models

Quantization is your best friend. It reduces model size by up to 75% with minimal quality loss. Look for models with Q4_K_M or Q5_K_M in the filename. These are the sweet spots.

Close everything else

This sounds obvious, but it matters. Close your browser, kill background apps, and give the model all available memory. The difference is night and day.

Experiment with context length

Smaller context windows use less memory. If you’re running out of RAM, reduce the context length in the settings. You’ll lose the ability to process long documents, but you’ll gain speed and stability.

These projects prove that free AI projects for laptops are more than just toys. They’re genuinely useful tools that respect your privacy and your wallet. For more ideas, check out self-hosting AI services at home — there’s a whole world of possibilities beyond chatbots.

So dust off that old laptop. Install one of these tools. You might be surprised at what it can do.

Continue Reading

Trending