Connect with us

How To

Delete Apple ID Permanently: Your Complete Step-by-Step Guide

Published

on

Delete Apple ID Permanently: Your Complete Step-by-Step Guide

Deciding to delete your Apple ID isn’t something you do on a whim. It’s a significant move that cuts you off from an entire ecosystem you’ve likely built over years. Maybe you’re switching platforms, simplifying your digital life, or consolidating multiple accounts. Whatever your reason, you need to understand exactly what you’re giving up and how to do it properly.

This isn’t just logging out. It’s a permanent farewell to your iCloud photos, App Store purchases, and Apple services. Let’s walk through what that really means and how to navigate the process without losing what matters to you.

What Vanishes When You Delete Your Apple ID

Imagine closing a digital door and having it lock behind you forever. That’s deleting an Apple ID. Apple makes the process straightforward, but the consequences are absolute.

Your access to every Apple service evaporates. iCloud, iMessage, FaceTime—they all stop recognizing you immediately. That photo library you’ve curated for years? Gone. Those apps and movies you bought? You can’t download them again. Even your Apple ID email address becomes unusable for creating new accounts.

Apple does keep some financial records for legal reasons, but everything else—your data, preferences, and digital footprint within their ecosystem—is scheduled for permanent deletion. Subscriptions like Apple Music or iCloud+ cancel at the end of their billing cycle. If you have an Apple Cash balance or credits, spend them first. Outstanding payments, including Apple Pay Later plans, will actually block the deletion process until settled.

Here’s a crucial detail many miss: deletion isn’t instant. Once you submit the request, Apple takes up to seven days to process it. During that window, you can still cancel if you have second thoughts. After that period, there’s no recovery. No customer service representative can bring it back.

Essential Preparation Before You Pull the Trigger

Rushing into this is a recipe for regret. Taking a few preparatory steps can save you from that sinking feeling of lost memories or important documents.

First, rescue your data. This is non-negotiable. Visit privacy.apple.com while signed into your account. You can download a copy of everything Apple stores about you—photos, contacts, calendar events, notes, and documents from iCloud Drive. Do this on a computer with plenty of storage space; the archive can be massive.

Next, perform a full sign-out symphony. Go to every iPhone, iPad, Mac, Apple TV, and even Windows computer where you’re signed into iCloud or the App Store. Don’t forget web browsers where you might be logged into iCloud.com. If you leave a device signed in, it could become problematic later, potentially locking you out of certain features.

Take inventory of your active subscriptions. Make a list. Decide which, if any, you want to continue with a different payment method or Apple ID. Remember, these will cancel automatically, but you might want to set up replacements beforehand to avoid service interruptions.

The Permanent Deletion Process: A Walkthrough

Ready to proceed? The entire operation is managed through Apple’s Data and Privacy website. You’ll need your Apple ID password and access to your trusted devices or phone number for two-factor authentication.

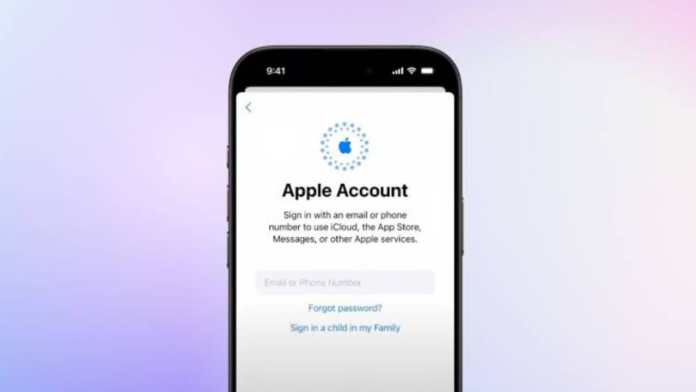
Open your web browser and navigate to privacy.apple.com. Sign in with the credentials for the account you wish to delete. The site will present you with several options. Look for the section boldly titled “Delete your account.”

Click the “Request to delete your account” button. Apple will ask you to select a reason from a dropdown menu—this is for their internal feedback. Then, you’ll face a comprehensive list of warnings about what you’re about to lose. Read it. Seriously, read every line.

After acknowledging the terms, you’ll choose how to receive updates about your deletion request (usually email). Then, the system generates a unique access code. This code is your only proof of identity for this request. Treat it like a priceless artifact. Take a screenshot, write it down on paper, save it in a password manager—do all three. You’ll need to enter this code immediately to confirm the request.

Finally, click “Delete account.” You’ll see a confirmation screen and be signed out. The countdown begins. Apple will email you when the process is complete, up to seven days later.

What If You Want a Trial Separation Instead?

Not ready for a permanent goodbye? Apple offers a middle ground: account deactivation. Think of it as putting your account into a deep freeze. All services are suspended, but your data remains stored on Apple’s servers. You can’t use iCloud, make purchases, or receive iMessages until you reactivate.

The process is nearly identical to deletion, but you select “Temporarily deactivate your account” on the privacy portal. You’ll still get a unique access code—guard this with your life, as it’s the only key to reactivation. Without it, your frozen account is effectively lost.

To reactivate, you must contact Apple Support directly and provide that code. They’ll verify it and thaw your account, restoring full access. Deactivation is perfect if you’re taking an extended break from Apple devices but think you might return.

Making the Final Decision

Deleting an Apple ID is a one-way street. Before you take that final step, ask yourself: Have I downloaded all my photos and important files? Are there any purchases or subscriptions I’ll genuinely miss? Is deactivation a safer option for now?

Double-check that you’ve signed out everywhere. Verify your data backup completed successfully. Ensure you’ve stored your access code in a secure, memorable place if you’re deactivating.

This process severs a significant digital connection. Done thoughtfully, it can be liberating. Done hastily, it can be a source of lasting frustration. Weigh the permanence against your reasons, follow the steps meticulously, and you’ll navigate this digital farewell without looking back with regret.

Continue Reading
Click to comment

Leave a Reply

Your email address will not be published. Required fields are marked *

How To

How to Make a WhatsApp Sticker from Your Photo: The Ultimate Guide for Custom Chat Fun

Published

on

How to Make a WhatsApp Sticker from Your Photo: The Ultimate Guide for Custom Chat Fun

Have you ever wanted to turn your favourite selfie into a playful sticker for WhatsApp? You are not alone. Millions of users love expressing themselves with custom stickers. In fact, learning how to make WhatsApp sticker from photo is simpler than you think. This guide walks you through every step so you can start sending personalised stickers today.

Why Create Custom WhatsApp Stickers from Your Photos?

Standard emojis and stickers are great, but nothing beats a sticker that features your own face or a funny moment. Custom stickers add a personal touch to conversations. They make your chats more engaging and memorable. Whether it is a birthday greeting or a silly expression, a photo-based sticker stands out.

Moreover, creating your own stickers is completely free. You only need a reliable app and a few minutes of your time. This process works on both Android and iOS devices. So, no matter what phone you use, you can join the fun.

What You Need to Make a WhatsApp Sticker from a Photo

Before diving into the steps, gather these essentials:

  • A smartphone with WhatsApp installed.
  • A photo you want to convert into a sticker.
  • The Sticker Maker app (available on Google Play Store).
  • Basic editing skills – cropping and background removal.

That is it. No paid subscriptions or advanced tools required.

Step-by-Step: How to Make a WhatsApp Sticker from Your Photo

Step 1: Download the Sticker Maker App

First, open the Google Play Store on your Android device. Search for “Sticker Maker”. Look for the app by developer Marsvard. It has millions of downloads and a high rating. Tap “Install” and wait for the download to finish.

Step 2: Open the App and Create a New Sticker Pack

Once installed, launch the Sticker Maker app. You will see a clean interface. Tap on “Create a new sticker pack”. A pop-up will ask you to name your pack. Choose something descriptive, like “My Faces” or “Funny Selfies”. This name will appear in WhatsApp later.

Step 3: Enable Permissions

The app will request access to your storage and photos. Grant these permissions. Without them, you cannot select an image from your gallery. Do not worry – the app only uses the photos you choose.

Step 4: Select Your Photo

Tap the gallery icon. Browse your photo library and pick the image you want to transform. For best results, choose a photo with a clear subject and a simple background. This makes editing easier.

Step 5: Edit and Remove the Background

After selecting the photo, the app opens an editing screen. Use the cropping tool to trim unwanted areas. Then, tap the magic wand icon to erase the background automatically. You can refine the edges manually. Add text or doodles if you want extra flair.

Step 6: Save Your Sticker

When you are satisfied with the result, tap the save icon. The sticker is now stored inside your sticker pack in the Sticker Maker app.

Step 7: Add the Sticker Pack to WhatsApp

Go back to the main screen of Sticker Maker. You will see your new pack listed. Tap the “Add to WhatsApp” button. A confirmation message will appear. Accept it. Now, open WhatsApp and check your sticker tray. Your custom pack should be there.

Step 8: Send Your Custom Sticker to Friends

Open any chat in WhatsApp. Tap the sticker icon (smiley face). Swipe to your new pack. Select the sticker and send it. Your friends will see your photo as a sticker. They can even download and reuse it.

Tips for Making Better WhatsApp Stickers

Creating high-quality stickers takes a little practice. Here are some pro tips:

  • Use high-resolution photos: Blurry images make blurry stickers.
  • Choose photos with good lighting: Bright, even light helps the background removal tool work better.
  • Keep it simple: Stickers with one subject look cleaner than crowded scenes.
  • Experiment with text: Add a funny caption to make your sticker more expressive.

These small adjustments can elevate your sticker game significantly.

Common Questions About Making WhatsApp Stickers from Photos

Can I make stickers from photos on an iPhone?

Yes. While this guide focuses on Android, iPhone users can use apps like “Sticker Maker Studio” from the App Store. The process is nearly identical.

Is it safe to use third-party sticker apps?

Most reputable apps, including Sticker Maker, are safe. They do not share your photos without permission. However, always check app permissions and user reviews before downloading.

How many stickers can I add to one pack?

WhatsApp allows up to 30 stickers per pack. You can create multiple packs for different moods or occasions.

Explore More WhatsApp Tricks

Custom stickers are just one way to enhance your WhatsApp experience. Check out our guide on how to send WhatsApp message without saving number for another handy tip. You might also enjoy learning how to unblock yourself on WhatsApp if you ever face that issue.

Final Thoughts

Learning to make WhatsApp sticker from photo is a fun, creative skill that adds personality to your chats. With the Sticker Maker app and the steps above, you can create unlimited custom stickers in minutes. So, grab your phone, pick a photo, and start designing. Your friends will love the personal touch.

If you found this tutorial helpful, share it with your social media circle. And if you have any questions, drop a comment below. Happy stickering!

Continue Reading

How To

TopU App Review: How to Make Free Online Video Calls and Chat with New People

Published

on

TopU App Review: How to Make Free Online Video Calls and Chat with New People

Are you looking to connect with new people from around the world without spending a dime? The TopU app offers a straightforward solution for free online video calling and chatting. Whether you want to make friends, practice a language, or simply explore different cultures, this platform provides a convenient way to interact face-to-face from your smartphone or computer.

In this review, we break down how the TopU app works, share practical tips for starting conversations, and guide you through the download process. By the end, you’ll have everything you need to start your journey toward meaningful online connections.

What Is the TopU App and How Does It Work?

The TopU app is a free communication tool designed to help users engage in live video calls and text chats with strangers. Unlike many dating apps that require a subscription for advanced features, TopU focuses on accessibility. You can send and receive messages directly from your browser without extra charges, making it ideal for international conversations.

This platform eliminates the need for expensive SMS fees when chatting with friends abroad. Instead, you rely on an internet connection to stay in touch. The interface is simple, allowing even first-time users to navigate with ease.

Key Features of TopU App

  • Free video calling: No hidden costs or premium tiers.
  • Live chat messaging: Text-based conversations work seamlessly.
  • Cross-platform support: Use it on Android devices or via a desktop browser.
  • Global reach: Connect with people from any country.

These features make the TopU app a solid choice for anyone who wants to chat with strangers without financial commitment.

How to Make Friends Online Using TopU App

Making friends online requires more than just downloading an app. You need the right approach to build rapport. Here are actionable tips to help you succeed:

Build Confidence Before the First Call

Confidence plays a major role in online interactions. Before you start a video call, take a deep breath and remind yourself that the other person is likely nervous too. Girls, in particular, appreciate when a guy shows ambition and genuine interest. Speak naturally and avoid trying too hard to impress.

Start with Simple Topics

Begin by learning about the other person’s likes and dislikes. Ask open-ended questions about their hobbies, favorite movies, or travel experiences. Share a bit about yourself as well. This balance creates a two-way conversation that feels comfortable.

For example, you might say: “I noticed you enjoy hiking. What’s the best trail you’ve ever visited?” This approach shows you’re paying attention and care about their interests.

Give Space and Be Patient

After a long conversation, it’s wise to step back. Don’t overwhelm the other person with constant messages. Let them miss you. Wait a day or two before reaching out again with a light topic. This strategy often makes the connection stronger.

Building on this, remember that patience is key. Not every chat will lead to a lasting friendship, but each one teaches you something new about communication.

How to Download and Install TopU App

Getting started with the TopU app is quick. Follow these steps:

  1. Visit the official TopU app page on the Google Play Store.
  2. Tap the “Install” button and wait for the download to finish.
  3. Open the app and create a profile using your email or phone number.
  4. Start browsing for users and initiate your first video call.

Alternatively, you can use the web version directly from your browser. This flexibility ensures you can stay connected even without your phone.

For more tips on dating apps, check out our guide on Enhance Dating Game with These 5 Best Dating Apps. If you’re interested in customizing your phone, read about Create Your Own Video Ringtone with Video Ringtone Maker App.

Frequently Asked Questions About TopU App

Is TopU app completely free?

Yes, the TopU app offers free video calling and chat features without any subscription fees. There are no hidden charges for international messaging.

Can I use TopU app on my computer?

Absolutely. The app works in any modern web browser, so you can chat from your desktop or laptop without installing extra software.

Is it safe to chat with strangers on TopU?

As with any online platform, exercise caution. Never share personal information like your address or financial details. Report any suspicious behavior to the app’s support team.

Final Thoughts

The TopU app provides a reliable and cost-free way to engage in free online video calling and text chat. Whether you’re looking to make new friends or simply pass the time, its straightforward design and global reach make it a worthwhile tool. Download it today and start exploring connections beyond your usual circle.

Continue Reading

How To

How to Personalize Your Android with a Custom Notification Bar Photo

Published

on

How to Personalize Your Android with a Custom Notification Bar Photo

Have you ever looked at your phone’s notification bar and wished it felt more personal? Most Android devices come with a standard, uniform look. However, with the right tool, you can transform it completely. This article explores how to use a custom notification bar app to add your own photo and change the entire appearance of your phone’s top panel.

Using a dedicated app, you can move beyond simple wallpapers and inject your personality directly into the interface. This guide will walk you through the best app for the job, its standout features, and a simple setup process. By the end, you will know exactly how to make your notification area uniquely yours.

Why Use a Custom Notification Bar App?

Stock Android offers limited options for changing the notification panel. You can adjust the wallpaper and maybe the accent color, but the bar itself often stays the same. A custom notification bar app breaks these limits. It gives you total control over the look and feel of one of the most-used parts of your screen.

In addition, these apps allow for deep personalization without needing root access. You can change colors, button shapes, and even the clock position. This means that your phone can reflect your style in a way that standard settings simply cannot match.

Top Features of a Notification Bar Customizer

The best apps for this task come packed with useful features. Understanding these will help you get the most out of the customization. Here are the key capabilities you should look for:

Change Colors and Styles

You can alter the background color of the notification panel bar itself. This goes beyond the system theme and lets you pick any shade you like. Furthermore, you can change the color of the brightness slider and the quick settings icons.

Resize and Rearrange Elements

Many apps let you resize the clock or move it to the left or right side of the bar. You can also adjust the size of the notification panel itself. This flexibility helps you create a layout that feels balanced and easy to use.

Add a Personal Photo

The standout feature is the ability to set your own image in the notification shade. You can pick a favorite photo from your gallery. This image then appears as a background or accent within the panel, making it truly yours.

How to Set Up a Custom Notification Bar on Android

Getting started is straightforward. You do not need any technical skills. Follow these simple steps to install and configure the app.

First, download a reliable custom notification bar app from the Google Play Store. Look for one with good reviews and the features listed above. Once installed, open the app and grant the necessary permissions, such as access to your photos and the ability to draw over other apps.

Next, navigate to the photo or background section within the app. Select the image you want to use from your gallery. You can usually crop or adjust it to fit the notification area perfectly. After that, explore the color and style settings to match the rest of your phone’s theme.

Finally, apply the changes. The app will typically ask you to enable a service or toggle a setting. Once active, your new, personalized notification bar will appear. If you have any questions, you can check the app’s help section or leave a comment below.

Conclusion: Make Your Phone Truly Yours

Personalizing your Android device does not have to be complicated. Using a custom notification bar app is a quick and effective way to stand out. You can change colors, adjust layouts, and most importantly, add your own photos.

This small change can make your daily phone use feel more enjoyable and personal. So, why stick with the default look? Download an app today and give your notification panel a fresh, custom makeover. For more tips on personalizing your device, check out our guide on changing your Android theme. You might also like our article on best Android customization apps.

Continue Reading

Trending