Connect with us

Cisco CCNA

How to Install Linux in VirtualBox: A Complete Beginner’s Guide

Published

on

How to Install Linux in VirtualBox: A Complete Beginner’s Guide

Ever wanted to try Linux without risking your main computer? Virtualization makes it possible. Think of it as running a computer inside your computer—a safe sandbox where you can experiment, learn, and explore. This guide walks you through installing Ubuntu Linux in VirtualBox, from downloading the software to navigating the desktop.

Why Virtual Machines Are Perfect for Learning Linux

Modern computers have power to spare. Multi-core processors and ample RAM mean you can run multiple operating systems simultaneously. Virtualization software like VirtualBox creates these virtual machines (VMs), letting you install and run Linux without touching your Windows or macOS installation.

What’s the advantage? Everything happens in isolation. If something goes wrong in the VM, your host computer remains unaffected. You can test software, learn commands, or explore different Linux distributions without fear. It’s like having a practice computer that you can reset with a few clicks.

Getting Ready: What You’ll Need

Before we start, let’s check your system. You’ll need a computer with at least 2GB of RAM and 10GB of free disk space. More is better—4GB RAM and 20GB disk space will give you a smoother experience. You’ll also need a reliable internet connection to download the necessary files.

We’ll be using two main components: VirtualBox (the virtualization software) and Ubuntu Desktop (the Linux distribution). Both are free and widely supported. Ubuntu offers an excellent starting point for Linux newcomers with its user-friendly interface and extensive documentation.

Step 1: Setting Up Your Virtual Environment

First, download VirtualBox from Oracle’s website. Choose the version matching your operating system—Windows, macOS, or Linux. The installation process is straightforward: run the downloaded file and accept the default settings. No special configuration needed at this stage.

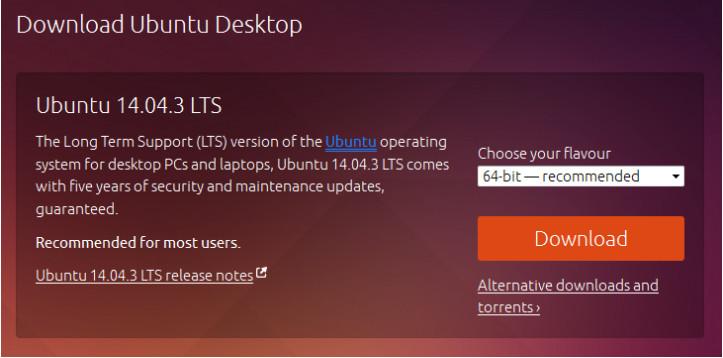
Next, grab the Ubuntu Desktop ISO. Visit ubuntu.com/download/desktop and select the 64-bit version unless you’re running older 32-bit hardware. The download is about 2GB, so grab a coffee while it completes. Save the file somewhere you’ll remember, like your Downloads folder.

Creating Your Virtual Machine

Open VirtualBox and click “New.” Name your VM “Ubuntu”—this helps keep things organized. Set Type to “Linux” and Version to “Ubuntu (64-bit).” Click through the memory allocation screen, keeping the slider in the green zone. Allocating too much RAM to the VM will slow down your host system.

For storage, create a virtual hard disk now. Choose VDI format and dynamically allocated storage. The default 10GB size works fine for basic exploration. Click “Create” and your empty VM appears in the VirtualBox manager.

Step 2: Installing Ubuntu Linux

Select your new Ubuntu VM and click “Start.” VirtualBox will prompt you to select a startup disk. Click the folder icon and navigate to your downloaded Ubuntu ISO file. This tells the VM to boot from the installation image rather than an empty virtual hard drive.

The Ubuntu installer loads. Choose “Install Ubuntu” rather than trying it live. You’ll see several preparation screens—most can be left at default settings. Check both “Download updates” and “Install third-party software” for the best experience. The installation type is crucial: select “Erase disk and install Ubuntu.” This sounds dangerous, but remember—it’s only erasing the virtual disk, not your actual computer’s drive.

Personalizing Your Installation

Set your timezone by clicking on the map. Choose your keyboard layout—most English speakers can stick with the default. Create your user account with a name and password. For practice purposes, many instructors recommend using “ITEUser” and “ITEpass!” to match lab environments. The installation process takes 15-30 minutes depending on your system. When complete, restart the VM.

Step 3: Exploring the Linux Desktop

Log into your fresh Ubuntu installation. You might notice the desktop looks small—that’s because we haven’t installed VirtualBox Guest Additions yet. These tools improve integration between host and guest systems. From the VirtualBox menu bar, select Devices > Insert Guest Additions CD Image. A virtual CD loads in Ubuntu.

Run the installation script when prompted. Enter your password when asked. The process installs better video drivers, shared clipboard functionality, and seamless mouse integration. Once complete, restart your VM from the Ubuntu system menu.

Navigating the Ubuntu Interface

After reboot, everything looks sharper. The desktop environment is clean and intuitive. The dock on the left provides quick access to common applications. Click the grid icon in the dock (called “Dash”) to search for programs. Type “web browser” to launch Firefox, Ubuntu’s default browser.

Want to try the command line? Search “terminal” in Dash. You’ll find three terminal emulators: Terminal, UXTerm, and XTerm. Terminal is the standard choice. This black window might seem intimidating, but it’s where Linux’s real power lives. We’ll explore commands in another guide.

The Virtual Machine Advantage

Why go through this setup? Virtual machines offer incredible flexibility. You can test software that might be unstable or dangerous. You can take snapshots before making major changes, then revert if things go wrong. Need multiple Linux distributions? Create separate VMs for each.

The trade-off? Virtualization consumes resources. Your host computer shares RAM, CPU cycles, and disk space with the VM. Performance won’t match running an OS directly on hardware. But for learning and development, it’s a small price to pay for safety and convenience.

Ready to continue your Linux journey? With Ubuntu running in VirtualBox, you have a perfect playground. Explore the applications menu. Customize the desktop. Browse the web. When you’re comfortable with the GUI, that terminal window awaits—gateway to Linux’s true potential.

Continue Reading
Click to comment

Leave a Reply

Your email address will not be published. Required fields are marked *

Cisco CCNA

Troubleshooting Switch Port Security: A Practical Packet Tracer Guide

Published

on

Troubleshooting Switch Port Security: A Practical Packet Tracer Guide

Network security policies exist for good reasons, but what happens when someone bypasses them? Imagine an employee bringing their personal laptop to work, disconnecting the company PC, and plugging in their own device. This exact scenario creates a common network security challenge that every network administrator must know how to resolve.

The Security Breach Scenario

Picture this: an employee at PC1 decides their personal laptop would work better. They disconnect the authorized company computer and connect their home device to the network outlet. This violates standard security policies that restrict personal devices on corporate networks. As the network administrator, you now face two tasks: enforcing the policy and restoring proper network functionality.

The immediate problem isn’t just policy violation—it’s that switch port security features have likely disabled the port entirely. When unauthorized devices connect to secured ports, Cisco switches can automatically shut down those ports to prevent network breaches. This protective measure becomes the very obstacle you need to overcome.

Diagnosing the Disabled Port

After reconnecting the legitimate PC1 to its proper port, you might expect normal operation to resume. Surprisingly, connectivity remains broken. The port status doesn’t change automatically. Why? Because the switch’s security mechanism has done its job too well.

To investigate, you’d enter the command show interface fa0/1 at the switch prompt. The response reveals the issue clearly: “FastEthernet0/1 is administratively down, line protocol is down (disabled).” This administrative shutdown resulted from the port security violation. The specific command responsible? switchport port-security violation shutdown—a configuration that automatically disables ports when security rules are broken.

Restoring Network Access

Fixing this requires manual intervention. You need to access the switch’s configuration mode for that specific interface. The process begins with entering interface configuration: interface fa0/1. From there, a simple but crucial command brings the port back to life: no shutdown.

This command removes the administrative shutdown status, allowing the port to negotiate connections again. Once enabled, you should verify restoration of normal operations. A quick ping test from PC1 to PC2 confirms whether connectivity has been properly reestablished. Successful pings indicate the security breach has been addressed and network functionality restored.

Lessons in Network Security Management

This troubleshooting exercise demonstrates several important principles. First, port security features work exactly as designed—they protect the network by disabling compromised ports. Second, restoring access requires understanding both the security configuration and basic interface management commands. Third, verification through testing completes the troubleshooting cycle.

Network security isn’t just about setting up protections; it’s equally about knowing how to manage them when they interact with human behavior. The employee’s well-intentioned but policy-violating action created a realistic scenario that network professionals encounter regularly. Handling it efficiently requires both technical knowledge and policy awareness.

What makes this Packet Tracer exercise particularly valuable is its simulation of real-world consequences. The port doesn’t magically fix itself after reconnecting the proper device. You must actively diagnose and resolve the security response. This hands-on experience builds the practical skills needed for actual network administration roles.

Remember that while re-enabling ports solves immediate connectivity issues, the broader security conversation remains. Policies exist for reasons beyond mere inconvenience—they protect network integrity, data security, and system stability. Each troubleshooting incident reinforces why those policies matter and how technical controls support them.

Continue Reading

Cisco CCNA

IT Essentials Chapter 3 Exam: Key Answers and Study Guide

Published

on

IT Essentials Chapter 3 Exam: Key Answers and Study Guide

Preparing for the IT Essentials Chapter 3 exam? You’re in the right place. This guide breaks down the critical questions and concepts you’ll encounter, covering both version 6.0 and 7.0 of the curriculum. Forget memorizing answers blindly—let’s understand the ‘why’ behind them.

Core Hardware and BIOS Fundamentals

The BIOS is your computer’s foundational software. It performs the Power-On Self-Test (POST) when you first boot up. If POST finds a problem, how does it tell you? It issues a series of short beeps. These beep codes are a universal language for hardware faults.

Need to enter the BIOS setup? You must press the correct key during the POST sequence, not before powering on or after Windows starts loading. Your saved BIOS settings live on a small CMOS memory chip, powered by a coin-cell battery. If that battery dies, you’ll lose those settings every time you power off.

Modern BIOS offers crucial security. Drive encryption scrambles data on your hard drive, making it unreadable even if the drive is physically moved to another machine. Features like LoJack take it further, allowing you to remotely locate, lock, or wipe a stolen device.

PC Assembly and Component Upgrades

Building or upgrading a PC requires precision. When installing a CPU, always apply fresh thermal compound correctly. Clean the old compound from the CPU and heat sink with isopropyl alcohol first. A thin, even layer is best—a thick glob can insulate heat instead of transferring it.

Aligning memory is simple. Look for a notch on the RAM module and match it with the notch in the motherboard slot. To prevent the motherboard from shorting against the metal case, you use small brass or plastic standoffs.

Thinking of a motherboard upgrade? It often means upgrading the CPU and RAM too, as newer boards require compatible, modern components. Want better gaming performance? Swapping a slow 5400 RPM hard drive for a solid-state drive (SSD) is one of the most impactful upgrades you can make.

Power, Protection, and RAID Configurations

Electrical issues can fry your components. A brownout is a prolonged reduction in AC voltage. To guard against this and blackouts, an Uninterruptible Power Supply (UPS) uses an internal battery to provide steady voltage.

For data protection and performance, RAID is essential. But which level do you choose? It depends entirely on your needs for speed, capacity, and fault tolerance.

Choosing the Right RAID Level

RAID 0 stripes data across drives for maximum speed and capacity, but offers zero protection. If one drive fails, all data is lost. Use it only if you have a solid, separate backup.

RAID 1 mirrors data between two drives. You get protection from a single drive failure, but you lose half your storage capacity to redundancy.

RAID 5 stripes data and parity across a minimum of three drives. It protects against one drive failure while offering good capacity and read speed. RAID 6 requires at least four drives and can withstand two simultaneous drive failures.

RAID 10 combines mirroring and striping. You need a minimum of four drives. It offers excellent speed and protection, as data is mirrored within striped pairs.

Specialized Systems and Component Selection

Not all computers are built the same. The components you choose depend on the user’s specific demands.

Running multiple virtual machines? Prioritize RAM and CPU cores. Virtualization is resource-hungry; each virtual machine needs its own slice of memory and processing power.

Building a server for a cloud provider? Think about fault tolerance and massive storage. Implementing a RAID array and installing multiple large hard drives are primary considerations.

What about a teleworker’s laptop? A built-in cellular card is crucial for reliable internet access anywhere, far beyond the reach of Wi-Fi.

Configuring a thin client? Its entire purpose is to connect to a central server, so a robust network connection is the non-negotiable core requirement.

Safety and Best Practices

Tech work isn’t just about plugging things in. Safety matters—for you and the environment. Disposing of an old CRT monitor? Be extremely cautious. They can retain a dangerous high-voltage charge long after being unplugged.

Empty inkjet cartridges shouldn’t go in the trash. Follow local regulations for recycling electronic waste. These cartridges contain chemicals that can harm the environment.

When installing unsigned device drivers, proceed only if you absolutely trust the source. Unsigned drivers haven’t been verified by the operating system vendor and can pose stability and security risks.

Mastering these concepts is the key to acing Chapter 3. Focus on understanding the principles behind RAID levels, the role of the BIOS, and how to match components to user needs. Good luck with your exam!

Continue Reading

Trending