Connect with us

How To

How to Turn Off Location on iPhone in 2024: A Complete Privacy Guide

Published

on

How to Turn Off Location on iPhone in 2024: A Complete Privacy Guide

Your iPhone constantly tracks your location, but you don’t have to let it. In 2024, protecting your digital privacy is more important than ever. This guide shows you exactly how to turn off location on iPhone in multiple ways, so you stay in control of your personal data.

Whether you want to disable location services entirely, restrict specific apps, or stop background tracking by system services, the steps are simple and effective. By the end, you’ll know how to lock down your iPhone’s location settings like a pro.

Why You Should Turn Off Location on iPhone

Location tracking drains your battery and exposes your whereabouts to apps and services. When you turn off location on iPhone, you prevent any app from accessing your GPS data. This boosts privacy and extends battery life.

However, turning it off completely means you lose features like Maps navigation, photo geotagging, and location-based reminders. That’s why many users prefer a more selective approach. You can allow essential apps while blocking others.

How to Disable Location Services Completely

If you want the strongest privacy, disable all location services. This is the most direct way to turn off location on iPhone for everything at once.

  1. Open the Settings app on your iPhone.
  2. Tap Privacy & Security.
  3. Select Location Services.
  4. Toggle the switch to Off.
  5. Confirm by tapping Turn Off in the pop-up.

Once you do this, no app or system service can access your location. This is ideal if you rarely use location-based features. But for more flexibility, you can adjust settings per app.

Turn Off Location on iPhone for Specific Apps

You don’t have to go nuclear to protect your privacy. Instead, you can turn off location on iPhone for individual apps while keeping it on for trusted ones.

Steps to Control App Location Access

  1. Go to Settings > Privacy & Security > Location Services.
  2. Scroll down to see the list of apps that have requested location access.
  3. Tap any app to adjust its permissions.
  4. Choose one of these options:
    • Never: Blocks all access.
    • Ask Next Time or When I Share: Prompts you each time.
    • While Using the App: Allows access only when the app is active.
    • Always: Grants background access (not recommended for most apps).
  5. Toggle Precise Location off to share only your approximate area.

This method gives you granular control. For example, you can allow Apple Maps to use your location while blocking social media apps. It’s a balanced way to maintain privacy without losing convenience.

How to Turn Off Location for System Services

Your iPhone runs many system services in the background that use location data. Turning these off can further enhance privacy. Here’s how to turn off location on iPhone for system-level features.

  1. Open Settings > Privacy & Security > Location Services.
  2. Scroll to the bottom and tap System Services.
  3. Toggle off services you don’t need, such as:
    • HomeKit: Only useful for smart home automation.
    • Apple Pay Merchant Identification: Helps identify stores when using Apple Pay.
    • Motion Calibration & Distance: Used for fitness tracking.
    • Location-Based Alerts: Sends location-triggered notifications.
    • Share My Location: For Find My and iMessage.

Disabling these can save battery and prevent background tracking. Review this list periodically, as new system services may appear after iOS updates.

Turn Off Location in Find My App

The Find My app helps you locate lost devices and share your location with friends. But if you want to stop sharing, you can turn off location on iPhone within this app.

Disable Find My iPhone

  1. Open Settings and tap your name at the top.
  2. Select Find My.
  3. Tap Find My iPhone and toggle it off.
  4. Enter your Apple ID password to confirm.

Turning off Find My iPhone prevents the device from being tracked if lost. It also stops location sharing with family and friends.

Stop Sharing Location with Specific People

  1. Go to Settings > Your Name > Find My.
  2. Toggle Share My Location off.
  3. To stop sharing with individuals, open the Find My app, go to the People tab, select a contact, and choose Stop Sharing My Location.

This is useful if you want privacy from specific contacts or before selling your iPhone.

Additional Privacy Tips for Your iPhone

Beyond location, you can further secure your device. Consider using a VPN for encrypted browsing—check out our guide on how to install a VPN for enhanced protection. Also, review app permissions regularly in Settings > Privacy.

For more on managing notifications, read our article on how to hide WhatsApp blue ticks on Android and iPhone. Staying proactive about privacy is key in 2024.

Final Thoughts

Taking control of your iPhone’s location settings is a simple yet powerful way to protect your privacy. Whether you choose to turn off location on iPhone completely, restrict specific apps, or disable system services, every step helps.

Review your settings today and adjust them to match your comfort level. Your personal data is valuable—keep it safe.

Continue Reading
Click to comment

Leave a Reply

Your email address will not be published. Required fields are marked *

How To

Mitron Android App Review: Everything You Need to Know About This TikTok Alternative

Published

on

Mitron Android App Review: Everything You Need to Know About This TikTok Alternative

Have you ever wondered what happens when a new short-video platform enters a market dominated by giants? The Mitron Android app burst onto the scene in early 2020 and quickly captured the attention of millions. Designed as a direct competitor to TikTok, this app offers a familiar yet fresh experience for users who love creating and watching short clips. In this guide, we will walk you through everything you need to know about the Mitron Android app, from its core features to step-by-step download and usage instructions.

What Is the Mitron Android App?

The Mitron Android app is a short-video sharing platform launched on the Google Play Store on 11 April 2020. Within weeks, it garnered over 5 million downloads and earned a strong 4.7-star rating from users. Much like TikTok, Mitron allows you to record, edit, and share videos set to music or soundtracks. You can browse a feed of user-generated content, like and comment on videos, and build a following of your own.

Key Features at a Glance

  • Video Creation: Record clips directly in the app or upload existing footage.
  • Music Library: Access a wide selection of songs and sound effects to add to your videos.
  • Social Interaction: Like, comment, and share videos with other users.
  • User Profiles: Create a profile to showcase your content and track your followers.
  • Simple Interface: Designed to be intuitive for both beginners and experienced creators.

How to Download the Mitron Android App

Getting the Mitron Android app on your device is straightforward. Follow these steps to install it:

  1. Open the Google Play Store on your Android smartphone or tablet.
  2. In the search bar, type “Mitron” and press enter.
  3. Look for the official app developed by Mitron App. It should have a colourful logo with a musical note.
  4. Tap the Install button and wait for the download to complete.
  5. Once installed, tap Open to launch the app.

Alternatively, you can use the direct download link provided on the official website. However, always ensure you download from trusted sources to avoid security risks.

How to Use the Mitron Android App

After installation, using the Mitron Android app is very similar to other short-video platforms. Here is a simple walkthrough:

Step 1: Sign In or Create an Account

When you open the app for the first time, it will ask for certain permissions, such as access to your camera and microphone. Grant these permissions so the app can function properly. Next, you need to sign in. You can create a new account using your email address, or log in quickly with your Facebook or Google account.

Step 2: Explore the Feed

Once logged in, you will see a vertical feed of videos. Swipe up to move to the next video, and swipe down to go back. You can like a video by double-tapping the screen, or leave a comment by tapping the comment icon.

Step 3: Create Your Own Video

To make a video, tap the plus (+) button at the bottom centre of the screen. You can record a new clip by holding the red record button, or upload a video from your gallery. After recording, you can add music, filters, and effects. When you are satisfied, tap Next, write a caption, and hit Post.

Step 4: Build Your Audience

Consistency is key to growing on Mitron. Post regularly, use trending sounds, and engage with other users by commenting on their videos. As your content gains traction, you will see your follower count rise.

Why Choose Mitron Over Other Apps?

The Mitron Android app stands out because it offers a TikTok-like experience with a growing community. It is lightweight, runs smoothly on most Android devices, and is completely free to use. For users in regions where TikTok may be restricted or for those looking for a fresh start, Mitron provides a viable alternative. The app’s developers are actively updating it with new features, which keeps the platform engaging.

Building on this, Mitron’s community is still relatively young, which means there is less competition for visibility compared to more established platforms. This makes it an excellent choice for new creators who want to grow an audience quickly. If you are looking for a short video app that is easy to use and has potential for viral growth, Mitron is worth trying.

Final Thoughts on the Mitron Android App

In summary, the Mitron Android app is a promising addition to the world of short-form video content. It delivers a familiar interface, a solid set of creation tools, and a rapidly expanding user base. Whether you are a casual viewer or an aspiring creator, this app offers plenty of opportunities to connect and have fun. Download it today and start exploring a new community of video enthusiasts.

For more app reviews and tech tips, check out our article on best video editing apps for Android or learn how to increase your followers on TikTok.

Continue Reading

How To

Redmi A4 5G Review: Affordable 5G Smartphone with 50MP Camera and Long Battery Life

Published

on

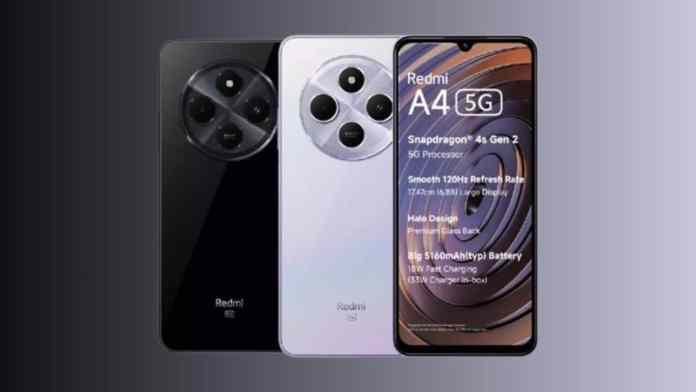
Redmi A4 5G: Budget-Friendly 5G Smartphone with Impressive Camera and Performance

Are you searching for an affordable 5G smartphone that doesn’t cut corners on features? The Redmi A4 5G might be exactly what you need. Priced competitively, this device brings together a sharp 50MP camera, a smooth 120Hz display, and a long-lasting battery — all powered by a capable Snapdragon processor. It’s a strong contender in the budget 5G phone segment.

Redmi A4 5G Price and Storage Variants

One of the biggest selling points of the Redmi A4 5G is its aggressive pricing. The base model with 4GB RAM and 64GB storage starts at just ₹8,499. Meanwhile, the 4GB RAM and 128GB storage variant is available for ₹9,499. These prices make 5G connectivity accessible to a much wider audience.

For those who need extra space for apps, photos, and videos, the 128GB option offers excellent value. Virtual RAM expansion also allows the 4GB RAM to function as 8GB, improving multitasking performance. This is a rare feature at this price point.

Display and Refresh Rate: Smooth Visuals on a Large Screen

The Redmi A4 5G features a 6.88-inch HD+ display, which is generously sized for media consumption. Whether you’re streaming movies, browsing social media, or playing casual games, the large screen provides an immersive experience.

What really sets it apart is the 120Hz refresh rate. This ensures that scrolling through feeds and navigating the interface feels buttery smooth. In this price bracket, a high refresh rate is a significant advantage. It makes everyday interactions feel more responsive and premium.

Performance: Snapdragon 4s Gen 2 and RAM

Under the hood, the Redmi A4 5G is powered by the Snapdragon 4s Gen 2 chipset. This processor is built for efficiency and handles daily tasks like web browsing, messaging, and light gaming without breaking a sweat. It ensures the phone runs smoothly even when multiple apps are open.

With 4GB of physical RAM and the option to expand virtually to 8GB, switching between apps is seamless. The 128GB storage variant provides ample space, and there’s likely room for expansion via microSD, though official confirmation is pending. For most users, this configuration will feel snappy and reliable.

Camera: 50MP Dual Rear Setup for Crisp Photos

Photography is a strong suit of the Redmi A4 5G. The 50MP dual rear camera captures detailed and vibrant images in good lighting. Whether you’re taking landscape shots or close-up portraits, the results are impressive for a budget device. You can expect sharpness and color accuracy that rivals more expensive phones.

On the front, a 5MP selfie camera handles video calls and casual self-portraits. While it’s not the highest resolution, it’s adequate for social media and video chats. The camera software likely includes AI enhancements to improve low-light performance and scene recognition.

Battery Life and Charging: All-Day Power

Battery capacity is another highlight. The Redmi A4 5G packs a 5160mAh battery, which easily lasts a full day of heavy use. Combined with the power-efficient Snapdragon chipset, you can expect excellent standby time and screen-on time.

When it’s time to recharge, the 18W fast charging support helps you get back to full quickly. While not the fastest charging speed available, it’s adequate for a battery of this size. You’ll likely find that a quick 30-minute charge provides several hours of use.

Final Verdict: Who Should Buy the Redmi A4 5G?

The Redmi A4 5G is an excellent choice for budget-conscious buyers who want 5G connectivity, a capable camera, and a large battery. It’s ideal for students, first-time smartphone users, or anyone looking for a reliable secondary device. The combination of a 120Hz display and Snapdragon processor makes it a solid performer for everyday tasks.

If you’re comparing options, you might also want to check out the itel A80 or the Motorola Edge 50 Neo for alternative choices. However, for pure value and future-proof 5G support, the Redmi A4 5G stands out in its segment.

In summary, this smartphone proves that you don’t need to spend a fortune to get modern features. With its sharp camera, smooth display, and long battery life, the Redmi A4 5G is a compelling package at an unbeatable price.

Continue Reading

How To

WhatsApp Extends Delete for Everyone Time Limit: Now You Have Over 2 Days to Retract Messages

Published

on

WhatsApp Extends Delete for Everyone Time Limit: Now You Have Over 2 Days to Retract Messages

Have you ever sent a message on WhatsApp and instantly regretted it? Perhaps you typed the wrong words, sent it to the wrong person, or simply changed your mind. Up until now, the popular instant messaging platform gave you just over an hour to undo that mistake. However, that is changing. WhatsApp is now rolling out a significantly extended delete messages time limit for everyone, giving users a much wider window to retract their digital footprints.

This update, which is currently making its way to beta testers on Android, dramatically increases the previous cap. According to reports from the reliable WhatsApp feature tracker WABetaInfo, the new limit is set at a generous 2 days and 12 hours. This means that users will have a full 60 hours to reconsider and delete a message after it has been sent.

What is the New Time Limit for Delete Messages?

For a long time, the standard delete messages time limit for the ‘Delete for Everyone’ feature was 1 hour, 8 minutes, and 16 seconds. While this was an improvement over the earlier 7-minute window, it still left many users wishing for more time. The new update, which is part of the WhatsApp beta for Android version 2.22.15.8, completely resets this expectation.

Building on this, the new limit of 2 days and 12 hours is a massive leap forward. It provides a safety net for those who might not check their messages immediately or who need time to reflect on what they have sent. This change positions WhatsApp as a more forgiving platform for communication.

How to Check If You Have the New Delete Limit

Wondering if this feature is already active on your device? The process is quite simple. Try to delete a message that you sent more than an hour ago but less than 2 days ago. If the option to ‘Delete for everyone’ appears, then the new limit is already enabled for your account. This is a clear indicator that you are part of the gradual rollout.

However, if you do not see this option yet, do not worry. As with many new features, WhatsApp is rolling this out incrementally to ensure stability. You may need to wait for a future update to hit your device.

Why This WhatsApp Privacy Update Matters

This extension is more than just a convenience; it is a significant privacy enhancement. In a world where digital communication is often rushed, having more control over your sent messages is crucial. This feature helps prevent misunderstandings and protects user privacy by allowing for the retraction of sensitive information long after it was initially sent.

Furthermore, this move signals that WhatsApp is listening to user feedback. The ability to delete for everyone is one of the app’s most popular privacy tools, and extending its time limit directly addresses a common user complaint. It shows a commitment to making the platform safer and more user-friendly.

Future Improvements: Group Admin Controls

According to insights from WABetaInfo, the development team is not stopping here. They are also working on another major improvement to the delete feature. In the future, group admins may be able to delete any message within a group, regardless of who sent it. This would be a powerful tool for moderating group chats and removing inappropriate or spam content.

This feature is still under development and does not have a confirmed release date. Nonetheless, it highlights the ongoing evolution of WhatsApp’s privacy and moderation tools. As the platform continues to roll out updates, users can expect even more granular control over their conversations.

To stay informed about the latest changes, you can follow our WhatsApp beta updates or check out our guide on essential WhatsApp privacy tips. This new time limit is a clear step forward, giving users the breathing room they need to manage their chats effectively.

Continue Reading

Trending