Connect with us

How To

Master the Discord In-Game Overlay: A Complete Guide for Gamers in 2025

Published

on

Master the Discord In-Game Overlay: A Complete Guide for Gamers in 2025

For gamers who thrive on teamwork, staying connected with teammates is non-negotiable. Discord in-game overlay makes this possible without ever alt-tabbing away from the action. Whether you’re coordinating a raid, streaming your gameplay, or just chatting with friends, this tool puts everything you need right on your screen. In this guide, we’ll explore how to set it up, customize it, and solve common problems, all with a focus on the latest 2025 updates.

What Is the Discord In-Game Overlay?

The Discord in-game overlay is a transparent panel that appears on top of your game window. It lets you access voice channels, text chats, video calls, and even live streams without minimizing your game. This feature is especially valuable during multiplayer sessions where quick communication can determine victory or defeat.

Think of it as a command center that floats over your screen. You can see who’s online, respond to messages, and monitor voice activity, all while keeping your hands on the keyboard and your eyes on the game. It eliminates the need to switch between windows, which can be a lifesaver during intense matches.

Key Features You Can Access

  • Chat Bar: Type and read messages without leaving the game.
  • Voice Channel Widget: See who is speaking and adjust volume on the fly.
  • Video Tiles: View your friends’ webcams or animated avatars.
  • Activity Widget: Display the game you’re currently playing.
  • Screen Share Widget: Watch live streams from your party instantly.
  • Notifications Panel: Never miss a mention or invite again.

However, not all games support the overlay equally. Some titles, especially those running in exclusive full-screen mode, may require tweaks. We’ll cover those later.

How to Set Up and Use the Discord In-Game Overlay

Getting started is straightforward. Follow these steps to enable and use the overlay in 2025:

  1. Open Discord on your PC and log in.
  2. Join a voice channel to enable voice communication.
  3. Press CTRL + ` (backtick key, usually above Tab) to open the overlay.
  4. Drag widgets by clicking their dotted edges to reposition them anywhere on your screen.
  5. Customize the layout by hiding widgets you don’t need. Right-click on any widget to see options.

This setup works for a wide range of games, from fast-paced shooters like Call of Duty to strategy titles like League of Legends. The key is to arrange elements so they don’t block critical game UI.

Streaming and Watching Games via the Overlay

One of the most popular uses of the Discord in-game overlay is live streaming. You can share your screen with your voice channel in a single click:

  1. Open the Chat Bar in the overlay.
  2. Click the Screen Share button.
  3. Your stream automatically broadcasts to your current voice channel.

Discord adjusts stream quality based on your internet speed, but you can manually override this. For viewers, streams from friends appear in the Streams widget. Click any stream to watch it in a floating window that stays on top of your game.

This feature fosters a split-screen-like experience, making remote gaming sessions feel more connected. It’s ideal for co-op games where you need to see each other’s perspectives.

Troubleshooting Common Discord Overlay Issues

Even with the best setup, problems can arise. If your overlay isn’t showing up, try these fixes:

Check Overlay Settings

  • Go to User Settings > Game Overlay and ensure the toggle is ON.
  • Scroll to the Registered Games list and confirm the overlay is enabled for your specific game.

Adjust Game Display Mode

The overlay only works in windowed or borderless windowed modes. If your game is in exclusive full-screen, switch it in the game’s video settings.

Test Compatibility

Some older or less popular games don’t support the overlay. Try launching a different game to see if the issue persists.

Platform Limitations

As of 2025, the overlay remains a Windows-only feature. macOS and Linux users will not see it, regardless of settings.

If none of these steps work, restart Discord or your PC. Updating to the latest Discord version often resolves lingering bugs.

When and How to Disable the Discord Overlay

While the overlay is helpful, it’s not always ideal. Some gamers turn it off to improve performance on older hardware, reduce screen clutter during competitive play, or avoid compatibility issues with certain games.

Disable for All Games

  1. Open Discord and go to User Settings (gear icon near your username).
  2. Navigate to Game Overlay under Activity Settings.
  3. Toggle Open Discord Overlay to OFF.

Disable for Specific Games Only

  1. In User Settings, go to Registered Games.
  2. Click the monitor icon next to the game you want to disable.
  3. Toggle the overlay OFF for that title only.

This selective approach lets you keep the overlay for cooperative games while turning it off for solo or competitive ones where every millisecond counts.

Pro Tips for a Better Overlay Experience

  • Customize widget positions to avoid covering important game HUD elements.
  • Use the shortcut key (CTRL + `) to toggle the overlay on and off quickly.
  • Hide unused widgets to reduce visual noise.
  • Keep Discord updated for the latest features and bug fixes.
  • Run games in borderless mode for the most stable overlay performance.
  • Ensure a stable internet connection for smooth voice and video.

For games that don’t support borderless mode natively, consider third-party tools like Borderless Gaming to force windowed borderless mode.

Final Thoughts

The Discord in-game overlay remains one of the most powerful tools for modern gamers. It streamlines communication, enhances streaming, and keeps you focused on the game. With the steps outlined above, you can master its setup, customize it to your liking, and troubleshoot any issues that come your way. Whether you’re a seasoned raider or a casual player, this feature can elevate your gaming sessions in 2025.

For more tips on optimizing your gaming setup, check out our guide on using Do Not Disturb on Android to minimize interruptions, or learn how to hide WhatsApp blue ticks for uninterrupted gaming.

Continue Reading
Click to comment

Leave a Reply

Your email address will not be published. Required fields are marked *

How To

How to Record Calls on Android and iPhone: A Step-by-Step Guide for 2025

Published

on

How to Record Calls on Android and iPhone: A Step-by-Step Guide for 2025

Recording phone conversations has become a common need for professionals, students, and everyday users. Whether you want to capture important business agreements, preserve family memories, or keep a record of critical discussions, knowing how to record calls on Android and iPhone is essential. However, the process isn’t always straightforward due to varying device capabilities, operating system restrictions, and legal requirements. This guide walks you through every reliable method, highlights the best iPhone call recording app options, and explains the call recording legality India rules you must follow.

Why People Need to Record Calls Today

Modern life moves fast, and memory often fails. Many individuals forget key details immediately after hanging up. Recordings serve as a reliable backup for business deals, client instructions, and personal commitments. Professionals use them during interviews, while students capture lecture notes from remote classes.

Moreover, families record conversations with elderly relatives to preserve stories and advice. Some users also rely on recordings for personal safety, documenting threatening or harassing calls. Beyond these uses, call recording boosts productivity. Instead of scribbling messy notes during a conversation, you can focus on the discussion and review the audio later.

Recordings also help teams align on decisions and avoid misunderstandings. Clear audio tracks make it easy to create accurate summaries, ensuring everyone stays on the same page.

Call Recording Legality in India Explained Clearly

Before you start recording, understanding the legal framework is crucial. Call recording legality India follows a consent-based system. You must inform the other party that you are recording the conversation. Recording without consent can lead to legal trouble, including privacy violations under Indian law.

Companies handling customer calls must also adhere to strict privacy regulations. Some states impose even stricter rules. Operating system updates now reflect these legal concerns. Many Android phones hide built-in recording tools in certain regions, and iPhones restrict silent recording entirely for safety reasons.

Because laws vary across countries, features differ by location. Apple blocks recording features in some nations, while Google restricts silent recording in many markets. Third-party apps must comply with similar safety laws. Therefore, obtaining clear consent remains the safest and most ethical approach. Always tell the other person before pressing record.

How to Record Calls on Android Easily Today

The method to record calls on Android depends heavily on your device model and region. Some smartphones come with a built-in recording feature. To check, open your Phone app and navigate to Settings. If you see a “Call Recording” option, enable it. During an active call, a record button usually appears on the screen.

However, this feature isn’t universal. Many devices automatically disable it in regions with strict privacy laws. If your phone lacks a built-in option, third-party apps step in. Auto Call Recorder is a popular choice. Download it from the Google Play Store, grant microphone and storage permissions, and enable automatic recording for specific contacts. On Android 10 and higher, you may need to activate accessibility permissions for the app to function properly.

The Google Phone app also supports recording on many devices, but availability hinges on your phone model and local regulations. Keep in mind that long recordings may stop if storage runs low. Some Android versions block call recording entirely due to restrictions.

Third-party apps, however, face challenges. They can crash during lengthy calls or record only one side of the conversation clearly. Some introduce subscription fees unexpectedly. These issues push users to seek more stable solutions.

iPhone Call Recording App Options and Limitations

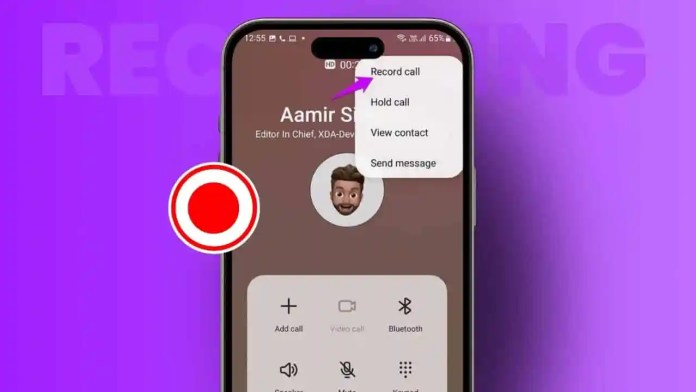
For Apple users, iPhone call recording app options have historically been limited. Apple blocked silent recording for years. With iOS 18, the company introduced a built-in recorder. During a call, tap the Record button. A loud announcement informs all participants that recording has started. The audio file saves automatically in the Notes app.

While convenient, this feature has drawbacks. It isn’t available in every country. It produces only an audio file without summaries or transcripts. The announcement makes discreet recording impossible. Alternatively, you can use speakerphone and the Voice Memos app, but audio quality often suffers from background noise.

Google Voice offers recording, but only for calls made to your Google Voice number and exclusively within the United States. Normal carrier calls remain unrecorded. For users outside the U.S., this method isn’t an option. Consequently, many iPhone owners turn to hardware solutions for reliable performance.

Why Third-Party Apps Often Fail Today

Software-based recording methods frequently encounter problems. Apps crash during long conversations, fail due to microphone restrictions, or get disabled by new privacy rules. Many include hidden fees for essential features. Some record low-quality audio, making playback difficult.

Operating system updates introduce tougher security measures globally. On Android, newer versions block background recording for privacy. On iOS, third-party apps cannot access the call audio stream directly. These restrictions make app performance unreliable. That’s why a growing number of users are shifting to hardware recording devices.

Hardware Recording: A Safe and Reliable Solution

Dedicated hardware recorders offer the most dependable experience. The Plaud Note is a standout device. It attaches to your phone via a magnetic MagSafe case or an adhesive ring for non-MagSafe models. The device features two recording modes: flip the switch up for Phone Call mode, down for On-Site mode during meetings.

Press and hold the main button to start recording. The device captures audio directly from the source, producing clear, crisp sound without needing speakerphone. It works across all platforms, including WhatsApp, Zoom, and FaceTime.

Plaud Note boasts impressive storage and battery life. With 64GB of memory, it stores thousands of hours of audio. It records continuously for nearly 50 hours and stays in standby mode for up to 60 days. The included AI features transcribe audio into text, support over 112 languages, generate short summaries, extract action items, and identify speakers. Over 3,000 templates help format professional notes, saving users hundreds of hours annually.

The Bottom Line

Learning how to record calls on Android is simple when you use safe, legal methods. iPhone call recording app options remain limited but are improving with each iOS update. Always respect call recording legality India rules by obtaining consent. Third-party apps can work but face increasing restrictions. For the best clarity and reliability, consider hardware solutions like the Plaud Note. Whichever method you choose, prioritize legal compliance and data safety. For more tips, check out our guide on how to hide WhatsApp blue ticks or learn about lock screen customization.

Continue Reading

How To

Lock Screen Widgets Android & iOS: The Ultimate Productivity Hacks Guide

Published

on

Lock Screen Widgets Android & iOS: The Ultimate Productivity Hacks Guide

Your smartphone’s lock screen is no longer just a barrier. Today, lock screen widgets on Android and iOS transform that idle screen into a powerful dashboard. Instead of unlocking your phone repeatedly, you can view calendar events, check the weather, or launch apps instantly. This shift saves seconds each time, adding up to minutes of reclaimed productivity every week. But how do you make the most of it? Let’s explore the best customization options and practical hacks for both platforms.

Why Lock Screen Widgets Matter for Daily Productivity

Every time you unlock your phone to check a notification, you risk distraction. Lock screen widgets eliminate that step. They place critical information—like upcoming meetings, weather forecasts, or fitness stats—right on the locked display. This means you can glance and go, without opening apps or scrolling through menus.

For professionals, calendar widgets are indispensable. They show your next appointment at a glance, preventing missed deadlines. Weather widgets, on the other hand, help you plan your commute or outfit without launching a separate app. Quick app launch widgets, such as for music or camera controls, reduce extra taps. Over time, these small efficiencies compound into significant time savings.

iOS Lock Screen Customization: Design Meets Function

Apple’s iOS 18 brought a wave of iOS lock screen customization options. Users can now tweak font styles, colors, and widget placements to suit their aesthetic. The result is a lock screen that feels personal and purposeful.

Visual Themes and Wallpaper Ideas

One popular trend is using gradient wallpapers. These create a modern, colorful look that pairs well with minimal widgets. Anime-themed designs, such as Studio Ghibli scenes, add a touch of nostalgia. For travelers, wallpapers featuring destinations can inspire wanderlust, while clock widgets show local times from around the world.

Textured wallpapers—like marble or iridescent finishes—add depth without clutter. Meanwhile, Photo Shuffle rotates your favorite images automatically, keeping the screen fresh. If you prefer a playful vibe, emoji pattern wallpapers let you choose up to six emojis arranged in grids or spirals.

The Depth Effect and Dynamic Widgets

iOS 18’s Depth Effect uses AI to separate subjects from backgrounds. This allows the clock to sit behind a person or object in your wallpaper, creating a 3D-like illusion. For best results, use clear, high-contrast subjects. Dynamic weather widgets animate live conditions—rain, clouds, or sunshine—making the screen feel alive.

Fitness enthusiasts can add Apple Watch activity rings directly to the lock screen. Calories, minutes of exercise, and stand hours appear at a glance. Similarly, astrology widgets show moon phases, while nature wallpapers bring forests or mountains to your pocket.

Android Lock Screen Widgets: Flexibility and Power

Android has long offered more flexibility with Android lock screen widgets. Depending on your device and OS version, you can add a variety of tools. Music controls let you pause or skip tracks without unlocking. Smart home widgets provide quick access to lights or thermostats. Voice assistant shortcuts enable hands-free tasks like setting reminders.

How to Add Widgets on Android

The process varies by manufacturer, but generally, you wake the phone and stay on the lock screen. Swipe left or right to access the widget panel, then tap the plus icon. After entering your PIN or password, you can choose from available widgets. Resize or reorder them as needed, then save. Samsung users, for instance, can find dedicated guides in the Galaxy Store.

Not all devices support every widget type. Older Android versions or budget phones may limit options. Always check your device’s compatibility before customizing.

Common Mistakes and Expert Widget Tips

While lock screen widgets boost productivity, overloading them can backfire. Too many widgets create visual clutter and may slow down your device. High-refresh widgets, like live weather animations, can drain battery life. Stick to widgets that update on demand rather than continuously.

Privacy is another concern. Widgets displaying sensitive information—such as email previews or calendar details—could be seen by others. Avoid showing notifications with personal data. Always use a PIN, pattern, or biometric lock to secure your device. Convenience should never compromise safety.

Experts recommend choosing widgets based on utility, not just looks. Frequent-use apps like calendar, weather, and music players are top choices. Glanceable information saves effort, and developers are improving widget privacy with each update. For more tips, check out our guide on hiding WhatsApp blue ticks to complement your lock screen setup.

Lock Screen Productivity Hacks for Daily Life

Lock screen productivity hacks go beyond widgets. They change how you interact with your phone. By reducing unnecessary unlocks, you minimize distractions. This helps maintain focus during work hours. Quick replies to messages become possible without opening the app. Meeting checks feel effortless, and music control stays smooth.

Even casual users benefit. App searching decreases, and phone usage feels more controlled. The lock screen subtly guides your daily priorities without adding stress. For example, a fitness widget reminds you to stand, while a news widget keeps you informed without diving into social media.

To further streamline your digital life, explore our article on using Do Not Disturb on Android. It pairs perfectly with lock screen widgets to minimize interruptions.

Final Thoughts

Lock screen widgets on Android and iOS are more than just decorative. They are practical tools that save time and reduce friction. Whether you prefer the polished design of iOS or the flexibility of Android, the key is choosing widgets that match your daily routine. Calendar, weather, and quick-launch apps remain the most useful. Keep layouts minimal to avoid clutter, and always prioritize privacy. With the right setup, your lock screen becomes a smart assistant that works for you.

Continue Reading

How To

How to Hide WhatsApp Blue Ticks on Android and iPhone: The Complete Privacy Guide

Published

on

How to Hide WhatsApp Blue Ticks on Android and iPhone: The Complete Privacy Guide

Do those two little blue checkmarks make your heart race? You are not alone. Millions of WhatsApp users feel the pressure of read receipts every day. The good news? You can hide WhatsApp blue ticks with just a few taps. This guide walks you through every method for Android, iPhone, WhatsApp Web, and even WhatsApp Business. Let us take control of your messaging privacy.

Understanding the WhatsApp Tick System

Before we dive into the how, let us understand the what. WhatsApp uses a simple visual system to show message status. A single grey tick means your message was sent. Two grey ticks confirm delivery to the recipient’s device. And those two blue ticks? They mean the message was opened.

But here is the catch: blue ticks do not always mean the person read every word. They might have seen a preview in their notification bar. Or they opened the chat to check the time. Still, the pressure to reply immediately is real. That is why many users choose to hide WhatsApp blue ticks entirely.

Why People Disable Read Receipts

Messaging anxiety is more common than you think. People often ask themselves: Did they ignore me? Should I send another message? Why are they not replying? These questions create unnecessary stress. Disabling read receipts removes that mental load. You can read messages at your own pace without the social pressure to respond instantly.

How to Disable Read Receipts on Android

Android users can turn off read receipts in under a minute. The setting is straightforward, but there are a few important details to remember.

Step-by-Step Instructions

  1. Open WhatsApp on your Android device.
  2. Tap the three vertical dots in the top-right corner.
  3. Select Settings from the dropdown menu.
  4. Tap Privacy.
  5. Scroll down to Read Receipts.
  6. Toggle the switch to the OFF position.

That is it. The change applies immediately to all your private chats. You will no longer see blue ticks on messages you send, and others will not see them on yours.

Important Android Notes

Here is what you need to know after disabling read receipts on Android:

  • Private chats update instantly. No restart required.
  • Group chats still show blue ticks. This is a WhatsApp policy you cannot bypass.
  • Voice messages still show a blue microphone icon when you listen to them.
  • Last Seen and Online status are separate settings. You must change them independently.

How to Disable Read Receipts on iPhone

iPhone users follow a similar path. The interface is slightly different, but the result is the same. You can hide WhatsApp blue ticks on iOS with ease.

Step-by-Step Instructions

  1. Open WhatsApp on your iPhone.
  2. Tap Settings at the bottom-right corner.
  3. Select Privacy.
  4. Scroll down to Read Receipts.
  5. Toggle the switch to the OFF position.

Once again, the change is immediate. Your private chats will no longer show blue ticks. However, group chats and voice messages remain unaffected.

Important iPhone Notes

  • Single and double grey ticks still appear. You can confirm delivery, just not reading.
  • Delivery updates function normally.
  • Group read receipts cannot be removed on any platform.
  • Your Online and Last Seen statuses remain visible unless you change them separately.

WhatsApp Web and Desktop: What Changes?

Many users ask about WhatsApp Web and desktop apps. The answer is simple: there is no separate setting. Whatever you choose on your phone applies automatically to all linked devices. If you disable read receipts on your Android or iPhone, WhatsApp Web will follow suit. You cannot hide blue ticks on web while keeping them on your phone.

WhatsApp Business and Blue Ticks

Business accounts have the same privacy options as personal ones. You can disable read receipts in WhatsApp Business by going to Settings > Privacy > Read Receipts. However, businesses should think twice before doing so.

Blue ticks serve a different purpose in business communication. They signal that a message has been acknowledged. Customers feel reassured when they see that a brand has read their inquiry. For support teams, keeping read receipts ON builds trust and transparency. If you run a business, consider your communication strategy carefully before hiding blue ticks.

What Changes When You Hide Blue Ticks?

Disabling read receipts changes the way you interact with WhatsApp. Here are the pros and cons to consider.

Pros of Disabling Read Receipts

  • More privacy: You can read messages without the sender knowing.
  • Reduced pressure: No need to reply instantly.
  • Better focus: Read during meetings or busy times without guilt.
  • Peace of mind: Avoid overthinking conversations.

Cons of Disabling Read Receipts

  • Mutual setting: You lose the ability to see when others read your messages.
  • Group chats: Blue ticks still appear in groups.
  • Voice messages: The blue microphone icon remains visible.
  • Business impact: May reduce customer trust for support teams.

Why Group Chats Still Show Blue Ticks

WhatsApp enforces group transparency. In group conversations, read receipts remain active regardless of your privacy settings. This ensures that all members can see who has viewed important messages. There is no workaround for this on any platform — Android, iPhone, WhatsApp Web, or WhatsApp Business. If you need to read a group message privately, your only option is to view it from the notification bar without opening the chat.

Why Voice Messages Still Show the Blue Mic

Voice messages operate differently from text. When you listen to a voice note, the microphone icon turns blue. The sender can see that you have listened completely. This happens even with read receipts turned off. WhatsApp treats listening as a separate action from reading. There is no option to disable this feature, so keep that in mind when sending or receiving voice messages.

Final Thoughts: Is Hiding Blue Ticks Right for You?

The decision to hide WhatsApp blue ticks comes down to your personal communication style. If you value privacy and want to reduce messaging anxiety, disabling read receipts is a smart move. However, remember that the setting works both ways. You will lose visibility into when others read your messages. Group chats and voice messages will still show indicators. For most personal users, the trade-off is worth it. For businesses, think carefully about customer expectations.

Take a moment to adjust your settings today. A few taps can give you back your peace of mind. And if you ever change your mind, you can always turn read receipts back on.

For more WhatsApp tips, check out our guide on how to enable end-to-end encrypted backups and how to send photos without losing quality.

Continue Reading

Trending