Connect with us

How To

Wasavi Tasks: The Ultimate Guide to Scheduling Messages and Auto-Replying on WhatsApp

Published

on

Wasavi Tasks: The Ultimate Guide to Scheduling Messages and Auto-Replying on WhatsApp

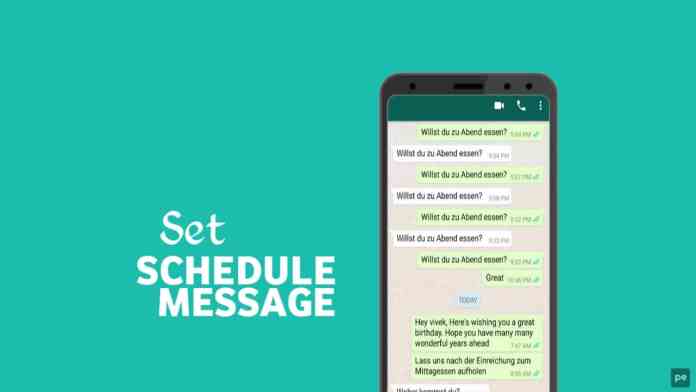
Have you ever missed a friend’s birthday message because you fell asleep? Or forgotten to send an important reminder at a specific time? This is where the Wasavi Tasks app transforms your messaging experience. This powerful Android application allows you to schedule messages and configure auto-replies, ensuring you never miss a crucial communication moment again.

What Exactly is the Wasavi Tasks App?

The Wasavi Tasks app is a specialized utility designed for Android users who want greater control over their messaging schedule. Fundamentally, it automates the process of sending texts through platforms like WhatsApp. Instead of manually sending a message, you can program it to be delivered at a precise date and time. This means you can wish someone “Happy Birthday” at midnight while you’re sound asleep or send a work reminder at 9 AM sharp without lifting a finger.

Building on this, the app’s auto-reply function acts as a virtual assistant. When you’re busy, driving, or in a meeting, the app can automatically respond to incoming messages with a pre-written reply. This maintains communication without requiring your immediate attention.

How to Download and Install Wasavi Tasks

Getting started with this message scheduler is straightforward. The process is designed to be user-friendly, even for those who aren’t tech-savvy.

Step-by-Step Installation Guide

First, unlock your Android device and open the Google Play Store. In the search bar at the top, type “Wasavi Tasks” and tap the search icon. The official app should appear in the results—look for the developer name to ensure it’s the correct application. Tap the “Install” button and wait for the download and installation to complete. The app icon will then appear in your app drawer, ready for configuration.

Core Features That Make Wasavi Tasks Stand Out

This isn’t just another basic scheduler. The Wasavi Tasks app packs several intelligent features that justify its place on your phone.

Primarily, the message scheduling is incredibly flexible. You can set a one-time message for a future date or create recurring messages for weekly meetings or regular check-ins. The interface allows you to select the exact contact or group, write your message, and choose the delivery time down to the minute.

Additionally, the app includes a calendar for special events. You can mark birthdays, anniversaries, or deadlines and link a scheduled message to each event. This creates a personal communication manager that reminds you of important dates and handles the messaging automatically.

For power users, the app offers task management, bot creation for automated interactions, and broadcast features to send scheduled messages to multiple contacts simultaneously. A welcomed bonus is the dark mode, which provides a sleek, eye-friendly interface for nighttime use.

Setting Up Your First Scheduled Message

After installation, open the Wasavi Tasks app. The system will request necessary permissions to read notifications and automate replies—grant these permissions for full functionality. Tap the prominent “+” button to create a new task. Select “Schedule Message” from the options.

Now, choose the messaging app you want to use (like WhatsApp), select the recipient from your contacts, and compose your message. This is where you write that birthday wish or reminder. Next, set the date and time for delivery. You can review all details before saving the task. Once saved, the app will handle the rest, sending your message precisely at the scheduled moment.

Configuring Auto-Replies for Busy Times

The auto-reply feature is perfect for when you’re unavailable. Within the Wasavi Tasks app, navigate to the auto-reply section. Create a new rule by specifying which contacts or keywords should trigger a reply. Then, write your standard response—for example, “I’m currently in a meeting and will respond shortly.”

You can activate this rule for specific time periods. Therefore, if you have a daily focus block from 2 PM to 4 PM, the app can automatically reply to anyone who messages you during that window. This maintains professionalism and manages sender expectations without any manual intervention from you.

For more advanced automation, explore our guide on other WhatsApp automation tools that can complement your setup.

Why This App Saves You Time and Stress

In our connected world, timely communication is often expected. The Wasavi Tasks app removes the mental burden of remembering to send messages. It ensures reliability—if you schedule it, it gets sent. This is invaluable for maintaining personal relationships and professional courtesy.

Moreover, the auto-reply function protects your focus. Instead of being interrupted by notifications, you can work deeply knowing that urgent messages will receive an instant, polite acknowledgment. This creates boundaries in an always-on culture.

Potential Considerations and Best Practices

While the app is powerful, use it thoughtfully. Scheduled messages should feel personal, not robotic. Avoid over-automating personal conversations. For business use, ensure auto-replies are clear and provide a realistic timeframe for your actual response.

Always keep the app updated through the Play Store to benefit from the latest features and security patches. Regularly review your scheduled tasks to ensure they are still relevant.

If you’re interested in expanding your app toolkit, consider reading about top productivity apps for Android that can further streamline your digital life.

Final Verdict: Is Wasavi Tasks Worth It?

For anyone who uses WhatsApp extensively for personal or professional reasons, the Wasavi Tasks app is a significant upgrade. It solves a genuine problem—forgetting to send timely messages—with an elegant, automated solution. The setup is simple, the features are robust, and the time-saving benefits are immediate.

This means that whether you’re a busy professional, a student with a packed schedule, or someone who just wants to be a more reliable friend, this app delivers tangible value. Download it, set up a few scheduled messages for upcoming events, and experience the peace of mind that comes with automated, timely communication.

Continue Reading
Click to comment

Leave a Reply

Your email address will not be published. Required fields are marked *

Social Media

Your YouTube Videos Look Different on a 65-Inch Screen. Here’s What to Do About It.

Published

on

YouTube on TV

The Living Room Is YouTube’s New Frontier

YouTube isn’t just for phones anymore. The platform is making a serious play for the biggest screen in the house — your TV. And the numbers back it up: YouTube reports that viewers now watch over 1 billion hours of content daily on TV screens. That’s not a niche. That’s a shift in how people consume video.

For marketers, this changes the game. Not in the cliché sense — literally. The way someone watches a video on a phone, hunched over during a commute, is completely different from how they experience it on a 65-inch OLED while lounging on a couch. Lean back vs. lean forward. Distracted vs. immersed.

If you’re still creating content with only mobile in mind, you’re leaving a massive audience segment on the table. Here’s how to fix that.

Why Connected TV Viewers Are Different

Think about the last time you watched YouTube on a TV. You probably weren’t scrolling. You weren’t multitasking. You were sitting back, maybe with a remote in hand, expecting a polished, high-production experience.

Connected TV (CTV) viewers behave differently. They watch longer sessions — often 20 minutes or more. They’re less likely to click away after five seconds. But they’re also more critical of poor audio, shaky camera work, and text that’s too small to read from across the room.

This audience isn’t hunting for quick how-tos. They want documentaries, deep dives, vlogs with a narrative arc, and content that feels like it belongs on a premium screen. If your video looks like it was shot on a webcam in 2010, they’ll bounce.

Optimize Your Channel for TV Discovery

YouTube on TV doesn’t work the same way as the mobile app. The interface is simplified. There’s no endless sidebar of suggested videos. Instead, the home screen features large thumbnails, bold titles, and a heavy emphasis on your channel’s brand identity.

Thumbnails Need to Pop on a Big Screen

That thumbnail you carefully designed for a phone screen? On a TV, it might look washed out or cluttered. Test your thumbnails at full size on a monitor. Use high contrast colors. Make faces large and expressive. Text should be minimal — three words max, and only if it’s readable from six feet away.

Channel Branding Matters More Than Ever

TV viewers are more likely to browse by channel rather than by individual video. That means your channel banner, logo, and series playlists become critical. If your branding is inconsistent or amateurish, it signals low quality. Invest in a clean, professional channel identity that looks good on a 4K display.

Five Technical Tweaks for TV-Friendly Video

You don’t need a Hollywood budget, but you do need to hit some basic technical thresholds. Here’s a quick checklist:

  • Resolution: Upload in 4K if possible. At minimum, 1080p at a high bitrate. TV screens magnify every compression artifact.
  • Aspect ratio: Stick to 16:9. Vertical or square videos look terrible on a TV — they get pillarboxed into tiny strips.
  • Audio: Use a decent microphone. TV speakers (or soundbars) reveal background noise and echo. Clear, balanced audio is non-negotiable.
  • Text and graphics: Don’t put critical information in the bottom third of the frame. TV screens often crop that area. Keep text centered and large.
  • Length: Aim for 10–20 minutes. CTV viewers settle in for longer content. Short clips feel like a tease.

New YouTube Features Built for TV

YouTube has rolled out several features specifically for the TV experience, and smart marketers are using them.

YouTube Shorts on TV — Yes, Really

In 2024, YouTube brought Shorts to the TV app. But here’s the twist: they appear in a vertical feed on the side of the screen, not full-screen. That means your Shorts need to work both as standalone vertical clips and as part of a larger TV interface. Keep the first two seconds punchy — that’s your hook on any screen.

QR Codes for Engagement

TV viewers can’t click a link. YouTube solved this with QR codes that appear on screen, letting viewers scan with their phone to subscribe, visit a website, or watch a related video. Add a QR code to your video’s end screen or description. Make it large enough to scan from a couch.

YouTube Select for TV

Brands can now buy ads specifically within YouTube’s TV app inventory. This is premium placement — full-screen, unskippable ads that run before or during long-form content. If your ad creative is built for mobile, it won’t work here. Produce TV-native ads with cinematic pacing and clear calls to action that don’t require a click.

Measuring Success on the Big Screen

Standard YouTube analytics won’t tell you how many viewers are on TV. You need to dig into the device report. Go to YouTube Studio → Analytics → Audience → Device type. Look for the “TV” category. If it’s growing, your strategy is working.

Pay attention to watch time from TV users. It’s usually higher per session than mobile. Also check the “Top videos on TV” report — it shows which of your videos resonate most with this audience. Double down on that format.

One more metric: engagement rate. TV viewers comment less (typing with a remote is painful), but they subscribe more. A spike in subscribers after a video goes live could mean it performed well on TV.

The Bottom Line for Marketers

YouTube on TV isn’t a future trend. It’s happening now. The platform is actively redesigning its interface, ad products, and content formats for the living room. If you’re not optimizing for it, you’re invisible to a growing, high-value audience.

Start small. Update your thumbnails. Check your aspect ratio. Look at your device analytics. Then produce one video specifically for the TV experience — longer, cleaner, more narrative. See what happens.

The couch is the new commute. Make sure your content looks good on it.

Continue Reading

How To

You’re storing your power tool batteries wrong. Here’s how to make them last longer

Published

on

power tool battery storage

The price of a dead battery

If you own cordless power tools, you’ve felt the sting. A new battery pack for a Ryobi, Milwaukee, or DeWALT system can cost as much as a decent tool itself. Drop $100 on a 5Ah pack, and you expect years of service. But many of us are accidentally cutting that lifespan in half — not through heavy use, but through bad storage habits.

The good news? Fixing this doesn’t require buying anything fancy. A few simple changes to how you store those bricks of lithium-ion power can add months or even years of reliable runtime.

Why heat is the #1 killer

Lithium-ion batteries hate heat. It’s not a minor preference — it’s a chemical fact. Storing a fully charged pack in a hot garage, a truck bed in summer, or near a furnace will permanently degrade the cells. You lose capacity. The tool runs for less time. Eventually, the pack won’t hold a charge at all.

Ideal storage temperature is between 50°F and 77°F (10°C to 25°C). That’s cool room temperature. If your garage hits 90°F+ in July, your batteries are cooking. Bring them inside during extreme heat. A basement or climate-controlled closet works great. Just keep them away from direct sunlight and heat sources.

What about cold?

Cold is far less damaging than heat. You can store batteries in a cold shop or unheated shed without permanent harm. But don’t charge a frozen battery. If the pack is below freezing, let it warm up slowly to room temperature before plugging it in. Charging a cold battery can cause internal damage and even safety risks.

The 40–80% charge rule

Most people store their batteries fully charged. It seems logical — grab and go, right? But a full charge stresses lithium-ion cells over time. The ideal storage charge is around 40% to 80% capacity. That’s the sweet spot where the chemistry is most stable.

If you have a battery you won’t use for a month or more, don’t leave it on the charger. Don’t store it at 100%. Instead, use it until the charge level drops to about half, then put it away. Some high-end chargers have a “storage mode” that does this automatically. For everyone else, a quick mental check before storing saves money.

Don’t drain them to zero either

Deep discharge is equally bad. Letting a battery sit until it’s completely dead can cause the voltage to drop so low that the battery management system locks it out permanently. The pack becomes a brick — unchargeable, useless.

If you have a battery that’s been sitting unused for months, check its voltage before charging. If it’s below the cutoff, you may need a specialized charger or a jump-start procedure. Prevention is simpler: store partially charged, and top them off every 3–6 months if they’re sitting idle.

How to organize your battery storage

A good storage system does three things: keeps batteries at moderate temperature, prevents physical damage, and reminds you to check charge levels periodically. Here are practical options:

  • Wall-mounted racks: Keep packs off concrete floors (which can be cold or damp) and away from dust. Many brands sell dedicated storage racks.
  • Plastic bins with lids: Great for bringing batteries indoors during heat waves. Just make sure they’re not airtight — a little ventilation helps.
  • Labeling by charge level: Use a piece of masking tape or a dry-erase marker to note the approximate charge. It takes five seconds and prevents guessing.
  • Rotation system: Use the oldest battery first. Newer packs sit longer, so store them at 60% charge and check every few months.

One more habit: clean the contacts

Dirt and corrosion on the battery terminals can cause poor connections, which makes the tool run weakly and the battery work harder. Wipe the metal contacts with a dry cloth or a pencil eraser occasionally. If you see white or green corrosion, a tiny bit of baking soda and water on a Q-tip neutralizes it. Dry thoroughly before using.

This isn’t glamorous advice. But it’s the kind that saves you from throwing away a $120 battery pack two years early. Heat, charge level, and cleanliness — get those three right, and your cordless tools will thank you.

Continue Reading

Social Media

Meta finally brings parental supervision to Threads — here’s what parents can control

Published

on

Threads parental supervision

The wait is over: Threads gets parental controls

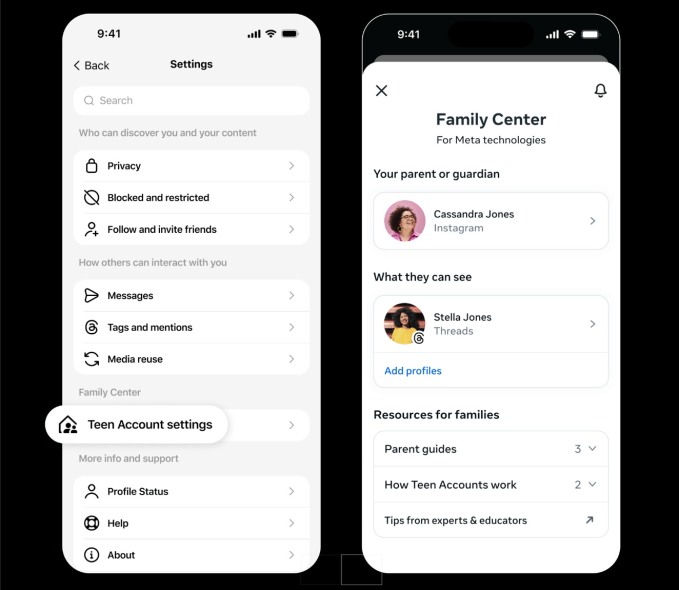
Nearly three years after Threads launched in July 2023, Meta is finally rolling out parental supervision tools for the platform. Starting next week in the U.S., parents and guardians will be able to monitor and manage their teen’s activity on the app through Meta’s Family Center — the same hub that already controls settings across Instagram and Facebook.

The move comes as Meta faces mounting pressure from regulators and lawmakers over teen safety. The company has been expanding parental controls across its apps for years, and Threads — now boasting 500 million monthly users — was a glaring gap. Lawsuits from multiple states and child safety advocates have only sharpened the spotlight.

So what can parents actually do? Quite a bit, it turns out.

Screen time tracking and daily limits

Parents will see exactly how much time their teen spends on Threads each day for the past week, including a weekly average. They can then set a daily time limit — and crucially, that limit applies across all devices. If a teen switches from phone to laptop, the clock keeps ticking.

Here’s what the new Threads parental supervision dashboard offers:

  • Daily time limit: Set a maximum number of minutes per day. Total time across devices is counted.
  • Sleep mode: Block or limit access during specific hours, especially at night. Meta already mutes notifications and turns on auto-replies for all teens from 10 p.m. to 7 a.m., but parents can tighten this further.
  • Privacy controls: Manage who can tag the teen in posts. Parents can also decide whether teens under 16 are allowed to change their default privacy settings — like private accounts — to something less restrictive.

Meta says teens on Threads already have built-in protections: private accounts by default, and limits on the content they see. But now parents have the final say on whether those settings can be loosened.

Why now? The pressure on Meta is real

It’s no secret that social media companies are under fire. Meta, along with TikTok, Snap, and others, faces a wave of lawsuits from states and school districts alleging that their platforms harm teens’ mental health. The U.S. Senate has held multiple hearings, and the Kids Online Safety Act (KOSA) is moving through Congress.

Threads was an obvious weak spot. While Instagram and Facebook have had parental controls for years, the text-based platform — which Meta positioned as a Twitter alternative — had none. For a company that says it prioritizes teen safety, that was a hard gap to explain.

Now, with these tools, Meta can argue that Threads is no longer the Wild West for teens. But critics note that supervision tools only work if parents actually use them — and many don’t.

What about the rest of the world?

The rollout starts in the U.S. next week. Meta told TechCrunch it plans to bring Threads parental supervision globally by the end of 2025. No specific countries or dates have been announced yet.

For parents outside the U.S., that means waiting — but not forever. And for teens? Well, the days of unlimited late-night scrolling on Threads may be numbered.

The bigger picture: Are parental controls enough?

Parental supervision tools are a step forward, but they’re not a silver bullet. A time limit doesn’t stop a teen from seeing harmful content during the minutes they are online. And Meta’s own research has shown that teens often find ways around parental controls — using friends’ phones, for example.

Still, the Threads parental supervision rollout is a meaningful addition. It gives parents a window into their teen’s digital habits, and a way to set boundaries without confiscating the phone entirely. For a platform that grew to half a billion users in less than three years, that kind of oversight was long overdue.

Whether it will satisfy regulators — or the parents filing lawsuits — is another question entirely.

Continue Reading

Trending