Connect with us

How To

You’re using VLC wrong if you’ve never opened this menu

Published

on

VLC advanced settings

VLC’s secret weapon: the advanced preferences menu

You’ve used VLC for years. Maybe you’ve recorded a screen, streamed a video, or converted a file. But there’s a hidden layer of settings that most people never touch. It’s called the advanced preferences menu, and it changes everything.

To get there, press Ctrl+P (or Cmd+P on a Mac) to open the standard preferences. Then, in the bottom-left corner, you’ll see a tiny toggle button labeled “All” or “Simple” — click it to switch to All settings. The menu explodes. Suddenly you have dozens of categories: Audio, Video, Subtitles, Input/Codecs, Interface, and more.

This is where VLC becomes a power tool. Most users never see this screen. They’re missing out.

What you can actually do from the advanced menu

Fine-tune audio and video filters

Under Video > Filters, you can enable deinterlacing, post-processing, or even a logo overlay. The audio section lets you apply equalization, compression, and spatializer effects. These aren’t gimmicks — they genuinely improve playback quality for certain files.

Control subtitle appearance like a pro

In Subtitles > Text renderer, you can change font, size, color, and even add a background. This is a lifesaver for anyone who watches foreign films with hard-to-read subtitles. You can also set a default encoding (like UTF-8) so subtitles never show garbled characters again.

Speed up or slow down playback with precision

Under Input/Codecs, you’ll find Playback speed settings. You can set a default speed, or use hotkeys (like [ and ]) to adjust on the fly. This is perfect for lecture videos or podcasts you want to skim through quickly.

The “Expert controls” tab: hidden power for advanced users

One of the most underused features is the Expert controls tab, found under Interface > Main interfaces. Check the box for Expert controls, restart VLC, and a new toolbar appears. It gives you direct access to frame-by-frame playback, snapshot settings, and media information with detailed codec data.

This is where you can really dig into a video file. Want to know the exact bitrate, resolution, or audio codec? It’s all there. No need for third-party tools.

Save your custom settings as a profile

Once you’ve tweaked everything to your liking, you can save the entire configuration as a profile. Go to Interface > Main interfaces > Lua and look for the Save configuration button. Or just export the current settings file from the Preferences window by clicking Save at the bottom. This is a huge time-saver if you use VLC on multiple computers.

You can also create keyboard shortcuts for almost any action. Under Interface > Hotkeys, you’ll find a massive list of commands. Assign your own shortcuts for things like increase volume, next frame, or toggle playlist. It’s like building your own custom remote control.

Why VLC’s advanced menu matters more than ever

VLC has been around for over two decades. Its humble interface may not give you many clues, but the app is incredibly capable. The advanced settings menu is the gateway to that power. If you’ve never opened it, you’re using VLC wrong.

Take five minutes. Press Ctrl+P, click All, and explore. You’ll find tools you didn’t know existed — and you’ll never go back to the simple view again.

Continue Reading
Click to comment

Leave a Reply

Your email address will not be published. Required fields are marked *

Social Media

How to Grow and Monetize a YouTube Channel (Even If You’re Starting Late)

Published

on

grow a YouTube channel

The Clock Is Ticking—But It’s Not Too Late

You’ve heard the horror stories. The platform is saturated. Every niche has a dozen established creators. The algorithm favors channels with years of history. And your window to build something meaningful? It’s closed.

That’s the narrative, anyway. But the data tells a different story. In 2024, YouTube still sees over 500 hours of video uploaded every minute—and yet, the vast majority of channels never break 1,000 subscribers. The opportunity isn’t gone. It’s just hidden behind a strategy most people refuse to execute.

This isn’t about luck or viral magic. It’s about a repeatable system that works whether you’re a solopreneur, a small business owner, or someone with a camera and a dream. Here’s how to grow a YouTube channel and monetize it, even if you’re starting from scratch today.

Why Most Late-Stage Channels Fail (And How to Avoid It)

The biggest mistake late starters make? They try to compete on production value. Fancy cameras, studio lighting, expensive editing software—they assume the barrier to entry is gear. It’s not.

New creators who fail do so because they ignore two things: search intent and audience psychology. They make videos for themselves, not for the person typing a query into YouTube’s search bar.

Think about it. When you search for “how to fix a leaky faucet,” you don’t care if the creator has 10 million subscribers or 10. You care whether the video solves your problem in the next 8 minutes. That’s your edge.

The Search-First Approach

Start by identifying high-volume, low-competition keywords in your niche. Use tools like TubeBuddy or VidIQ to find terms with strong search volume but fewer competing videos. Then, create content that answers those queries better than anyone else.

For example, instead of “How to edit photos in Lightroom” (saturated), try “How to edit a dark wedding photo in Lightroom in 5 minutes” (specific, searchable). That specificity is your hook.

The 3-Step System to Grow a YouTube Channel From Zero

Here’s the framework that works for late starters. It’s not complicated, but it demands consistency.

Step 1: Nail Your First 30 Seconds

YouTube’s algorithm measures retention. If viewers click away in the first 15 seconds, your video gets buried. Open with a promise: “In this video, I’ll show you exactly how I made $500 in my first month on YouTube.” Then deliver. No fluff, no intro music, no “like and subscribe” yet.

Step 2: Batch Your Content Around Pillars

Choose 3–4 content pillars that align with your expertise. For a cooking channel, that might be: 15-minute meals, budget-friendly recipes, kitchen hacks, and equipment reviews. Each pillar serves a different search intent, but they all funnel viewers to your core topic.

Batch-record multiple videos in one session. This saves time and keeps your upload schedule consistent—critical for the algorithm. Aim for one video per week minimum.

Step 3: Optimize Every Single Element

Your title, thumbnail, description, and tags aren’t afterthoughts. They’re the storefront. Use power words in titles (“simple,” “proven,” “ultimate”). Test different thumbnail colors and faces—bright yellows and reds outperform muted tones. Write a description that includes your focus keyphrase naturally, and add timestamps for longer videos.

One more thing: don’t ignore the comments section. Reply to every comment within the first 48 hours. Engagement signals to YouTube that your video is active, which boosts its ranking.

How to Monetize Your YouTube Channel Without Waiting for 1,000 Subscribers

The old path to monetization is clear: hit 1,000 subscribers and 4,000 watch hours, then join the YouTube Partner Program. But that’s not your only option—and it shouldn’t be your only goal.

You can start earning money from day one through these methods:

  • Affiliate marketing: Promote products you genuinely use and include affiliate links in your description. Tools like Amazon Associates or ShareASale work well. For example, a tech review channel can link to the exact laptop or microphone featured.
  • Digital products: Sell templates, e-books, or courses directly to your audience. A fitness channel might sell a 30-day workout plan for $10. Use platforms like Gumroad or Payhip.
  • Brand sponsorships: Once you have 500–1,000 engaged subscribers, small brands will pay for shoutouts. Reach out to companies in your niche with a media kit showing your engagement rates.
  • Channel memberships and Super Chat: Enable these features as soon as you’re eligible. Even a small, loyal audience can generate recurring revenue.

The key is to diversify early. Don’t rely solely on ad revenue—it’s volatile and pays pennies per thousand views in most niches. Instead, treat your channel as a lead generation engine for higher-ticket offers.

Real-World Example: A Late Starter Who Made It Work

Take Sarah, a 42-year-old accountant who launched a personal finance channel in early 2023. She had zero video experience, a smartphone, and a ring light. Her first 20 videos averaged 200 views. But she stuck to the search-first approach, targeting phrases like “how to save $10,000 in a year on a $50,000 salary.”

By month six, one video hit 50,000 views. She used that momentum to launch a budgeting spreadsheet template for $15. Within three months, she’d made over $2,000 in affiliate commissions and product sales. Today, she has 8,000 subscribers and a part-time income stream.

Sarah’s story isn’t unique. It’s replicable if you focus on solving specific problems for a specific audience. The algorithm rewards usefulness, not age.

The Bottom Line: Your Start Date Doesn’t Matter

YouTube’s landscape in 2024 is crowded, but it’s not closed. The creators who grow are the ones who treat it like a business from day one—not a hobby. They research keywords, optimize relentlessly, and monetize multiple streams before the first ad dollar arrives.

If you’re starting late, you have one advantage: you can learn from everyone else’s mistakes. Skip the shiny gear. Skip the vague content. Go straight to answering the questions your audience is already asking.

For more on building a sustainable online presence, check out our guide on social media marketing strategies for small businesses and learn how to create content that converts viewers into customers.

Continue Reading

How To

Three new Paramount+ movies worth your time this week (July 6-12)

Published

on

Paramount+ movies this week

Paramount+ is having a busy July — here are three new titles to stream right now

July is shaping up to be a packed month for Paramount+. Between the long-awaited fourth season of Star Trek: Strange New Worlds, the emotional series finale of The Chi, and the live broadcast of Conor McGregor’s return to the Octagon, the platform has something for everyone. But if you’re looking specifically for new movies hitting the service this week (July 6-12), you’re in luck. Here are three fresh arrivals you won’t want to miss.

1. Conor McGregor vs. Michael Chandler — UFC 303 (July 12 on demand)

The biggest fight of the summer lands on Paramount+ the day after its live CBS broadcast. Conor McGregor returns to the UFC after a three-year absence to face Michael Chandler in a welterweight bout that’s already generating massive buzz. The event airs live on CBS on July 11, then becomes available on demand on Paramount+ starting July 12.

This isn’t just a fight — it’s a cultural moment. McGregor, the former two-division champion, has been out of the cage since breaking his leg in 2021. Chandler, a former Bellator champion, has been calling him out for years. The stakes are high, the trash talk has been relentless, and the production value from the UFC promises to be top-tier. If you missed the live broadcast, this on-demand version is the next best thing.

2. Star Trek: Strange New Worlds — Season 4 premiere (July 10)

Yes, it’s a TV series, but the premiere episode of Season 4 of Strange New Worlds is essentially a feature-length event. The show has become a fan favorite for its blend of classic Star Trek episodic storytelling with modern serialized arcs. Season 4 picks up after the cliffhanger of Season 3, which saw Captain Pike (Anson Mount) and the crew of the USS Enterprise facing a new existential threat from the Gorn.

Early reviews suggest this season leans even harder into character-driven drama while delivering the kind of space spectacle that made the franchise iconic. If you’re a Star Trek fan who hasn’t caught up yet, now’s the perfect time to binge Seasons 1-3 before the new episodes drop.

3. The Chi — Series finale (July 27, but the final episodes start this week)

Lena Waithe’s acclaimed Chicago drama The Chi is coming to an end after six seasons. The final batch of episodes begins streaming this week, building toward the series finale on July 27. The show has been praised for its authentic portrayal of life on the South Side of Chicago, its ensemble cast, and its willingness to tackle tough social issues without losing its heart.

The final season has been described by critics as a satisfying conclusion that honors the characters and the community. If you’ve been following the show, this is the week to start watching the endgame. If you’re new, the first five seasons are all available on Paramount+ for a full binge.

What else is coming to Paramount+ in July?

Beyond this week’s highlights, July has more in store. The platform is also adding Mission: Impossible — Dead Reckoning Part One later in the month, along with a new documentary series about the making of Top Gun: Maverick. For sports fans, the UEFA Champions League final replay will also be available.

Paramount+ is clearly betting big on exclusive content this summer. Whether you’re into sci-fi, drama, or combat sports, there’s enough variety to keep you busy through the heat of July.

How to watch: Paramount+ plans and pricing

If you’re not already subscribed, Paramount+ offers two tiers: the ad-supported Essential plan at $5.99/month, and the ad-free Premium plan at $11.99/month. The Premium tier also includes access to your local CBS station live, which is how you can watch the McGregor fight on July 11. All plans include a 7-day free trial for new subscribers.

For the best experience with the UFC event, make sure your internet connection is stable — live sports streaming can be demanding. And if you’re planning to binge Strange New Worlds or The Chi, the Premium tier’s lack of ads makes for a smoother viewing experience.

Final thoughts: A strong week for Paramount+

This week’s lineup shows that Paramount+ is serious about competing with the bigger streaming services. A major UFC comeback, a beloved sci-fi franchise, and the end of a critically acclaimed drama — all in one week. That’s a solid value proposition for any cord-cutter.

If you only pick one thing to watch, go with the Strange New Worlds premiere. It’s the kind of event television that reminds you why streaming can still feel special. But don’t sleep on the McGregor fight — it’ll be the most talked-about sporting event of the month, and having it on demand the next day is a nice perk.

Continue Reading

Social Media

How to Reserve and Change Your WhatsApp Username: A Step-by-Step Guide

Published

on

WhatsApp username

What Is the WhatsApp Username Feature?

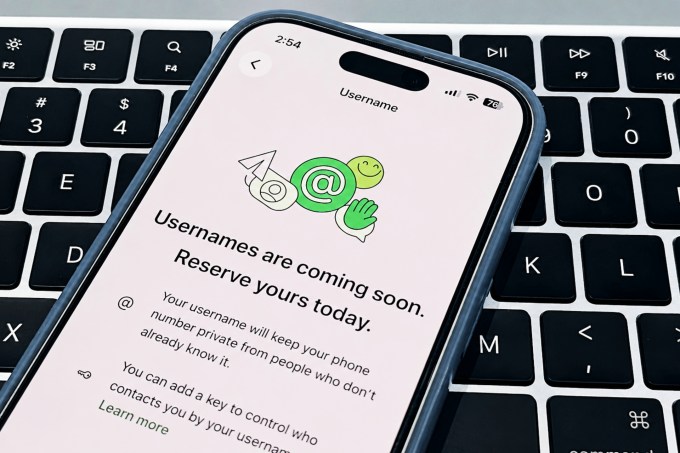
In early June, WhatsApp began rolling out username reservations for its massive user base of 3 billion people. The feature isn’t active yet — you can’t message someone using just a username right now. But you can claim your handle early, so when it goes live later this year, you’re ready.

Why does this matter? Usernames let you share a contact without handing over your phone number. Think about it: you meet someone at a conference, or you’re a small business owner posting on social media. Instead of typing out a 10-digit number that could get scraped by bots, you just say, “Find me on WhatsApp as @YourName.” That’s a big win for privacy.

How to Reserve Your WhatsApp Username

Reserving a username takes about 30 seconds. Here’s the exact path:

  1. Open WhatsApp and go to Settings.
  2. Tap Account, then look under the “Your Account” section for the Username option.
  3. If this is your first time, you’ll see a “Create username” button. Tap it and type your desired handle.
  4. If the name you want is taken, tap Suggest a username. WhatsApp will offer variations that are still available.

One catch: WhatsApp is reserving certain usernames of public figures and major entities. So don’t expect to snag @elonmusk or @nike. If you already have a username on Facebook or Instagram, you can log in through either service and claim the same handle on WhatsApp — a neat cross-platform trick.

How to Change or Delete Your WhatsApp Username

Changed your mind? No problem. Go back to Settings > Account > Username. In the top-right corner, tap the Edit button. You can type a new name or simply delete your username entirely if you decide you don’t want one.

There’s no limit on how many times you can change it — at least not yet. Just remember that once the feature goes live, your contacts will see whatever username you’ve set. So pick something you’re comfortable with.

Extra Privacy: The Username Key

WhatsApp isn’t stopping at just hiding your phone number. They’ve added an optional layer of protection called the username key.

From the username menu, you can restrict who can contact you. The default is Everyone — anyone who knows your username can message you. But you can switch it to People who know my key. Here’s how it works:

  • You share your username and a unique four-digit key.
  • When someone messages you for the first time, they must enter that key.
  • You can save the key or generate a new one at any time.

This is a smart middle ground. You get the convenience of a username without spam. Think of it like a PIN for your inbox.

When Will the Feature Go Live?

WhatsApp says the username feature will become active “in the coming weeks.” For now, they’re only letting people claim names to prevent a land grab later. If you want your handle, grab it now. Waiting until launch day might leave you with @user928374 instead of something clean.

Once it’s live, expect more updates — possibly group chat usernames or the ability to search for people by username. For now, just reserve, relax, and keep an eye on your settings.

Continue Reading

Trending